Responsive Navigation: Designing a Seamless Menu Experience

Imagine walking into a restaurant where the menu automatically adjusts based on whether you’re in the mood for a quick bite or a full-course meal. If you’re in a hurry, it highlights the appetizers and daily specials. If you’re ready to indulge, it elegantly expands to showcase the chef’s signature dishes. That’s what a responsive navigation menu does for your website—tailors the browsing experience to fit the user’s needs, whether they’re on a desktop, tablet, or smartphone. It’s about serving up the perfect menu of options for every digital diner who visits your site, ensuring that everyone leaves satisfied, no matter the device they use.

A responsive navigation menu is much more than a fancy gadget in your web design toolkit; it’s your user’s personal guide in the vast and often chaotic digital landscape. As screen sizes shrink and expand from desktop giants to palm-sized smartphones, your site’s navigation should effortlessly adjust to meet each device’s needs.

Why is this crucial? Because in today’s world, a frustrating navigation experience is like a bad handshake—it’s awkward and starts things off on the wrong foot. Ensuring your menu morphs gracefully across devices enhances user experience, boosts accessibility, and keeps visitors coming back. It’s not just about making things look pretty; it’s about creating a fluid, intuitive pathway that makes your visitors feel right at home, whether they’re clicking on a desktop or tapping on a smartphone. Let’s dive in and see how you can roll out the red carpet for every device visiting your site.

Keep Reading

Using em and rem Relative Units in Web Design

Typography plays a vital role in web design, shaping the visual appeal and readability of content. As websites continue to evolve and adapt to various devices and screen sizes, the need for flexible and scalable typography becomes increasingly crucial. This is where em and rem relative units come into play.

Em and rem units are relative units of measurement that offer a powerful way to size elements, margins, and typography in a flexible and scalable manner. While both units have their unique characteristics, they share a common goal: to provide a more adaptable and user-friendly experience across different devices.

What Are em and rem Units?

Typography and layout elements on a webpage often require flexible sizing to adapt to different screen sizes and user preferences. Em and rem units offer a dynamic approach to achieve this flexibility, allowing designers to create responsive and accessible designs.

Defining em and rem Units

Em and rem units are relative units of measurement in CSS that enable designers to specify sizes and dimensions relative to other elements. While they share similarities, they have distinct characteristics.

Em units (short for “emphatic”) are relative to their parent element. When you assign a font size or any other property using em units, the value is calculated based on the font size of the element’s parent. For example, if an element has a font size of 1em and its parent has a font size of 16 pixels, the element’s font size will be 16 pixels.

Rem units (short for “root emphatic”) differ from em units in that they are relative to the root element of the HTML document, typically the <html> tag. This means that when you assign a font size or any other property using rem units, the value is calculated based on the root element’s font size. This allows for more consistent sizing across the entire document, regardless of nesting levels.

What’s the Difference Between em and rem?

The key distinction between em and rem units lies in their relative reference points. Em units are influenced by the font size of the parent element, which can lead to compounding effects when nesting elements with different font sizes. On the other hand, rem units provide a more straightforward and predictable approach as they are based on the root element’s font size.

Advantages of Using em and rem Units

  • Scalability: Em and rem units excel in creating scalable designs. Defining sizes in relation to parent or root elements allows you to easily adjust the size of entire sections or even the entire website by modifying a single value. This scalability is particularly valuable for responsive designs that need to adapt across various devices and screen sizes.
  • Accessibility: Em and rem units contribute to improved accessibility by allowing users to adjust font sizes according to their preferences. Users with visual impairments or those who prefer larger or smaller text sizes can rely on browser settings or custom stylesheets to scale the content appropriately.
  • Consistency: Rem units, in particular, promote consistency throughout a website. Since they are based on the root element’s font size, changes to the root font size will uniformly affect all elements that use rem units, ensuring a harmonious typographic hierarchy.

Practical Applications of em and rem Units

Responsive Typography
  • Flexible Typography with em Units
    Em units shine when it comes to creating flexible and adaptable typography. Setting font sizes using em units establishes a typography system that scales seamlessly with its parent element. This enables text to adjust proportionally across different screen sizes, making it more readable and user-friendly. Whether it’s the body text, headings, or any other text elements, utilizing em units allows for more fluid and responsive typography.
  • Consistent Spacing with rem Units
    Rem units offer a straightforward and consistent approach to managing spacing within a design system. By setting margins, padding, and other spacing-related properties using rem units, you can establish a consistent rhythm and spacing hierarchy throughout your website. Changes made to the root font size will cascade down and proportionally adjust all rem-based measurements. This ensures a cohesive and harmonious visual experience, irrespective of the device or screen size.
  • Sizing Elements, Margins, and Padding
    Em and rem units can be applied to various aspects of web design, such as sizing elements, defining margins, and setting padding. When it comes to sizing elements, using em units allows for relative sizing based on the parent element, making it easier to create responsive and scalable designs. Similarly, applying em or rem units to margins and padding ensures consistent spacing around elements, even as the layout adjusts to different viewport sizes.

Best Practices for Using em and rem Units

To make the most of em and rem units in your web design projects, it’s essential to follow some best practices. These guidelines will help you leverage the power of these relative units effectively and ensure a consistent and accessible user experience across different devices and browsers.

Establishing a Baseline Font Size and Using Units Appropriately

Before diving into using em and rem units, it’s crucial to establish a baseline font size for your design. This baseline font size serves as a reference point for all other font sizes defined using em and rem units. Setting the baseline font size using an absolute unit like pixels (px) or points (pt) provides a fallback option and maintains control over the overall visual hierarchy of your design. From there, you can use em and rem units to scale the typography and other elements proportionally.

Handling Nested Elements and Compounding Effects

Nested elements pose a challenge when using em units. To prevent compounding effects and maintain a predictable sizing behavior, it’s recommended to establish a clear structure and limit the use of em units within nested elements. Instead, consider using rem units within nested components to maintain a consistent size relative to the root element.

For example, suppose you have a card component with nested elements like headings and paragraphs. To avoid unintended resizing, set the font sizes of the nested elements using rem units based on the root font size. This ensures that the text within the card maintains a consistent size, regardless of its nesting level.

Considerations for Accessibility and User Experience

When using em and rem units in web design, it’s crucial to consider accessibility and prioritize the user experience. Let’s explore some key considerations to ensure that your designs are accessible and provide an optimal experience for all users:

Impact on Readability and Accessibility

One of the advantages of using em and rem units is their ability to create flexible and scalable designs. However, it’s important to strike a balance between flexibility and readability. Font sizes that are too small or too large can negatively impact the readability of your content, especially for users with visual impairments or those viewing your website on small screens.

Ensure that the font sizes defined using em and rem units are accessible and meet the WCAG (Web Content Accessibility Guidelines) requirements for contrast and legibility. Aim for a minimum font size that allows users to comfortably read the text without straining their eyes. Conduct user testing and gather feedback to validate the readability of your designs across different devices and user scenarios.

Relationship with Responsive Design

Em and rem units play a significant role in creating responsive designs that adapt seamlessly to different devices and screen sizes. By using these relative units, your design elements can scale proportionally, providing a consistent user experience across various devices, from mobile phones to large desktop screens.

When implementing responsive design with em and rem units, consider the breakpoints and media queries that define the layout changes at different screen sizes. Ensure that the font sizes and other elements adapt appropriately to maintain readability and usability on all devices. Testing your designs on various devices and screen sizes can identify any issues and make necessary adjustments to optimize the user experience.

Using em and rem units in web design offers numerous benefits, including flexibility, scalability, and improved user experience. By understanding the differences between em and rem units and applying best practices, you can create designs that adapt seamlessly to different devices and screen sizes while maintaining readability and accessibility. Remember to prioritize the needs of all users, test your designs for keyboard accessibility, and follow established guidelines to ensure an inclusive and engaging experience. Embrace the power of relative units to create visually appealing and responsive designs that captivate and cater to your audience.

Responsive Typography: Creating Stunning Designs for Every Screen

Today with websites being accessed on a plethora of devices with varying screen sizes, the need for responsive web design has never been more crucial. One vital aspect of responsive design is responsive typography, which plays a pivotal role in delivering an optimal user experience across different devices. It ensures that text remains legible, visually appealing, and accessible, regardless of the screen size or orientation.

Responsive typography goes beyond simply adjusting font sizes. It involves understanding the principles of typography and implementing techniques that allow text to adapt and flow seamlessly within different layouts. With responsive typography, web designers can create websites that not only look stunning but also provide an exceptional reading experience for users on smartphones, tablets, laptops, and desktops.

Follow as we unravel the principles and best practices that empower designers to craft flexible and visually appealing typographic systems. We will explore the challenges and benefits of responsive typography, delve into the techniques for implementing it effectively, and discuss the accessibility considerations that should underpin every typographic decision. Whether you’re a seasoned designer or new to the field, this article will equip you with the knowledge and tools to optimize your typography for responsiveness and create remarkable user experiences.

What is Responsive Typography?

Responsive typography is the art and science of creating typography systems that seamlessly adapt to different devices and screen sizes. It involves implementing design principles and techniques that allow text to adjust dynamically, ensuring optimal legibility, readability, and aesthetics across various viewing contexts.

In a responsive environment, typography faces unique challenges. Traditional approaches to typography may not suffice when text needs to accommodate different screen resolutions, orientations, and viewing distances. Maintaining legibility and readability becomes crucial, as text must remain clear and easy to consume on devices ranging from small smartphones to large desktop monitors.

Legibility, readability, and aesthetics are key considerations when dealing with typography in a responsive design. Legibility refers to the ease with which individual characters can be distinguished, while readability focuses on the overall comprehension of written content. Achieving these factors across devices requires careful attention to font selection, size, spacing, line length, and contrast.

Additionally, responsive typography must consider the aesthetic aspect, ensuring that the visual harmony of the design is preserved at various screen sizes. Typography plays a significant role in establishing the tone and personality of a website, and it should maintain its visual appeal while adapting to different contexts.

From a design perspective, responsive typography allows for greater flexibility and creativity. It enables designers to experiment with font sizes, line spacing, and typography styles to achieve the desired impact on different screen sizes. Furthermore, responsive typography contributes to the accessibility of a website, ensuring that individuals with varying abilities can access and engage with the content.

Principles of Responsive Typography

Fluid typography is a fundamental principle of responsive design that ensures text scales proportionally with the viewport size. It allows typography to adapt seamlessly to different devices and screen sizes, maintaining optimal legibility and readability. With percentage-based font sizing and viewport-relative units, such as viewport width (vw) or viewport height (vh), typography can dynamically resize based on the available space, creating a harmonious and flexible reading experience.

The concept of a modular scale is key to establishing a consistent typographic hierarchy across various breakpoints. A modular scale is a sequence of harmonious font sizes based on a defined ratio, such as the golden ratio or the Fibonacci sequence. By following a modular scale, designers can create a set of type sizes that maintain visual harmony and hierarchy, regardless of the screen size. This approach ensures a cohesive and balanced typographic system throughout the responsive design.

Breakpoints and media queries play a vital role in responsive typography by enabling different typographic styles to be applied at specific screen sizes. Defining breakpoints in the CSS code enables designers to target different screen widths and adjust typography accordingly. This allows for tailored typography styles, such as font sizes, line heights, and even font choices, to be optimized for specific breakpoints, enhancing legibility and visual impact.

Relative units, such as em (relative to the font size of the parent element) and rem (relative to the font size of the root element), offer advantages in creating scalable and responsive typography. Using relative units can ensure that typography adapts proportionally to changes in the parent or root font size. This allows for more consistent and flexible typography across different elements and breakpoints, as the relative units adjust based on the font size context.

As technology continues to advance, new trends and advancements in responsive typography are shaping the future of web design. One notable development is the emergence of variable fonts. Unlike traditional fonts that offer a fixed set of styles, variable fonts provide a range of adjustable attributes, such as weight, width, and slant, all within a single file. This flexibility allows designers to create dynamic typographic systems that adapt seamlessly to different screen sizes and user preferences. Variable fonts offer the potential for greater efficiency in delivering typographic variety and optimizing performance, ultimately enhancing the responsive nature of typography.

Put Your Type to Work

Responsive typography plays a vital role in creating engaging and accessible web experiences across various devices and screen sizes. By understanding the principles and best practices of responsive typography, designers can ensure their content remains legible, aesthetically pleasing, and adaptable. Remember to consider accessibility guidelines, such as providing sufficient contrast and using appropriate font sizes, to ensure inclusivity for all users.

Testing is also crucial in the implementation of responsive typography. Be sure to examine your typography across different devices, browsers, and screen resolutions to ensure consistent readability and optimal user experience. Conduct user testing and gather feedback to fine-tune your typographic choices and make necessary adjustments.

As web design continues to evolve, staying up to date with emerging trends and advancements in responsive typography will be essential. Embrace new technologies, explore dynamic typographic systems, and continually seek innovative ways to enhance your typographic designs.

Consider prioritizing responsive typography and incorporating it into your web design workflow to create visually stunning and user-friendly experiences that captivate and engage your audience across all devices.

Top 10 Tips for an Exceptional User Experience

In this digital and connected world, where users have countless options at their fingertips, delivering an exceptional user experience has become a crucial aspect of successful web design. It’s not enough to simply have a visually appealing website; you must also prioritize usability, accessibility, and engagement to captivate your audience and keep them coming back for more.

In this article, we will explore ten essential tips that can significantly enhance UX in web design. From intuitive navigation to responsive layouts, we will discuss the fundamental elements that contribute to creating a seamless and delightful visit. Implementing these strategies can elevate your website’s usability, improve customer satisfaction, and ultimately drive conversions and success.

Clear and Intuitive Navigation

An effortless navigation experience is crucial for engaging website visitors. Clear labels, logical organization, and intuitive menus are key elements that contribute to a user-friendly interface.

Position your navigation menu at the top of the webpage for easy visibility and consistency across all pages. Use concise and descriptive labels that accurately represent the content of each page. Visual cues, such as icons or dropdown menus, can enhance clarity.

Organize your content into meaningful sections and subcategories, prioritizing important pages. Regularly test your navigation with real users to identify and address any pain points or confusion.

By implementing clear and intuitive navigation, you create a seamless user path that fosters trust and professionalism. Visitors will appreciate a website that respects their time and provides information effortlessly, ultimately leaving a positive and lasting impression.

Responsive Design

Mobile-first responsive design

In today’s mobile-centric world, a responsive design is no longer an option but a necessity. With an increasing number of users accessing websites from a variety of devices, it’s crucial to create a seamless and enjoyable experience across all screen sizes.

Responsive design allows your website to automatically adapt its images, layout, and content to provide optimal viewing and interaction on desktops, laptops, tablets, and smartphones. This adaptability ensures that users can easily navigate and consume your content without the frustration of zooming or scrolling excessively.

When implementing responsive design, focus on optimizing the user interface for touch interactions on mobile devices. Consider the hierarchy of information, prioritize key content, and maintain consistent branding and design elements across different screen sizes.

With a mobile-first responsive design, you demonstrate your commitment to user convenience and accessibility, while your website becomes a versatile and flexible platform that seamlessly adapts to any device, enhancing user engagement and satisfaction.

Lightning-Fast Load Times

Things aren’t slowing down. With attention spans shorter than ever, the need for a blazing-fast website cannot be overstated. Users expect instant gratification, and any delay in loading can quickly lead to frustration and abandonment.

To meet these expectations, it is crucial to optimize your website’s performance and ensure lightning-fast load times. Start by focusing on reducing file sizes, such as images, scripts, and CSS files. Compress and optimize these assets without sacrificing quality to minimize the data that needs to be transferred to the user’s device.

Leveraging caching techniques is another effective strategy. Implement browser caching, which stores certain elements of your website on the user’s device, allowing subsequent visits to load faster. Additionally, utilize server-side caching to generate and store static versions of your web pages, reducing the processing time required for each request.

Optimizing your code is equally important. Minify HTML, CSS, and JavaScript files by removing unnecessary spaces, comments, and line breaks. Consider using asynchronous loading for JavaScript files to prevent blocking the rendering of your web page.

Regularly monitor and analyze your website’s performance using tools like Google PageSpeed Insights or GTmetrix. These tools provide insights and recommendations for improving load times. Address any identified issues promptly, making performance optimization an ongoing priority.

With faster load times, you create a positive user experience that keeps visitors engaged and satisfied. Users will appreciate your website’s responsiveness, resulting in increased conversions, lower bounce rates, and improved search engine rankings.

Readable Typography

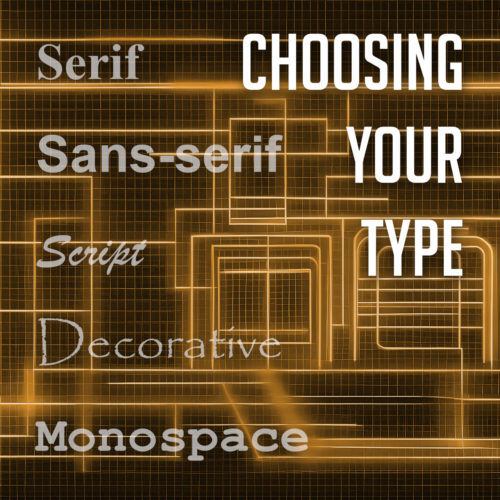
Choosing your type

Your choice of typography plays a vital role in shaping the overall user experience. Aesthetically pleasing fonts are undoubtedly important, but it is equally crucial to prioritize readability to ensure that your content is effortlessly consumed.

Selecting legible fonts is the first step towards enhancing readability. Opt for fonts that are easy on the eyes and maintain clarity even at smaller sizes. Sans-serif fonts like Arial, Helvetica, or Roboto are popular choices due to their clean and modern appearance. However, serif fonts like Times New Roman or Georgia can also be effective for conveying a sense of elegance and sophistication.

Alongside font selection, consider the appropriate font size to facilitate comfortable reading. Text that is too small strains the eyes, while text that is excessively large disrupts the flow of content. Strike a balance by choosing a font size that allows users to effortlessly consume the information without squinting or feeling overwhelmed.

Line spacing, also known as leading, plays a significant role in improving readability. Ample spacing between lines prevents the text from appearing cramped and enhances the overall clarity of the content. Aim for a line spacing that provides enough breathing room between each line while maintaining a cohesive and visually pleasing structure.

Consistent and Engaging Visual Design

Consistency is a cornerstone of effective web design, especially when it comes to visual elements. Establishing a consistent and engaging visual design creates a cohesive experience that captivates users and reinforces your brand identity.

Start by selecting a color palette that reflects your brand and evokes the desired emotions. Consistency in color usage across your website’s various elements, such as buttons, headers, and backgrounds, creates visual harmony and familiarity.

Incorporate captivating imagery that resonates with your audience and aligns with your brand identity. High-quality images can communicate your message effectively and evoke emotions. Consistency in imagery style and quality further enhances the visual appeal.

By maintaining consistency in color schemes, typography, and imagery, you establish brand recognition and create a unified experience across your website. This consistency instills trust, helps users navigate intuitively, and reinforces your brand’s identity. A cohesive visual design captivates users, encourages engagement, and leaves a lasting impression.

Clear Call-to-Action

A well-designed call-to-action (CTA) stands out from the rest of the page, capturing users’ attention and compelling them to act. It should clearly communicate the desired action, whether it’s signing up for a newsletter, making a purchase, or contacting your business.

Placement is key when it comes to CTAs. Position them strategically within your website’s layout, ensuring they are easily noticeable and accessible. Consider placing CTAs above the fold or in prominent areas where users’ attention is naturally drawn.

A clear and persuasive CTA is a vital element of your website design, driving user engagement and achieving your goals. Use action-oriented language and attention-grabbing colors to create a sense of urgency. Test and optimize your CTAs regularly to maximize their impact and guide users towards desired actions. Effective CTAs are the catalyst for increased user engagement and conversions.

Streamlined Forms

Web forms

Streamlining the form completion process is crucial for enhancing UX and increasing form submissions. Simplify forms by minimizing the number of required fields and only requesting essential information. Use inline validation to provide real-time feedback and guide users in filling out the form correctly.

Clear and concise instructions help users understand the purpose of each field and how to complete the form. Further optimize the form submission process by eliminating unnecessary steps and providing a clear confirmation message upon submission. With well-designed forms, you improve user satisfaction and encourage higher conversion rates.

Error Handling and Feedback

Effective error handling and feedback play a vital role in creating a seamless user experience on your website. When users encounter errors or perform actions that require feedback, it is crucial to provide clear and informative messages. Error messages should clearly communicate what went wrong in a concise and understandable manner, avoiding technical jargon.

Additionally, offer specific guidance on how users can rectify the issue or provide alternative solutions. Visual cues such as color changes or icons can also help draw attention to errors and provide visual feedback. Implementing robust error handling and feedback mechanisms empowers users to navigate through potential obstacles and ensures a smoother and more user-friendly experience.

Accessibility

Designing with accessibility in mind is essential to create an inclusive and user-centric user experience. Considering the needs of users with disabilities ensures that your website is usable by a wider audience.

One crucial aspect is screen reader compatibility, where providing appropriate alternative text for images and implementing semantic markup allows visually impaired users to navigate and understand the content effectively. Keyboard navigation is another vital consideration, enabling users to navigate through your website using only the keyboard, without relying on a mouse.

Additionally, pay attention to color contrast to ensure that text and other visual elements are easily distinguishable for users with visual impairments.

Personalization

Personalization has become a key factor in enhancing user experience. Tailoring content and experiences based on user preferences and behaviors can greatly improve engagement and satisfaction. Utilize user data and technologies like cookies and user accounts to deliver personalized recommendations, relevant content, and targeted offers.

Personalization goes beyond addressing users by name; it involves understanding their needs and providing them with tailored information or experiences. Incorporating personalization strategies creates a unique and engaging website that keeps users coming back for more.

Incorporating these tips into your web design practices can greatly enhance the overall user experience of your website. From intuitive navigation to responsive design, fast load times to readable typography, each aspect plays a crucial role in creating a positive and engaging feel for the user. By prioritizing user needs and preferences, you can build a website that not only captivates and delights your visitors but also drives business success. So, go ahead and implement these tips, and watch as your website becomes a user-friendly destination that delights and engages your users.
Responsive Images: Optimizing Web Design With Adaptive Visuals

Have you ever visited a website on your smartphone and found that the images were either too small, too large, or cropped in a weird way? If so, you have encountered a website that does not use responsive images. Responsive images are images that adjust to different screen sizes, resolutions, positions, and other factors. They are essential for creating websites that work well on devices with widely differing screen sizes, resolutions, and other such features.

In this dynamic world where devices come in various sizes and resolutions, incorporating responsive images has become essential. Ensuring that images adapt seamlessly to different screens is not only crucial for a visually appealing website but also for optimal user experience. In this article, we will explore the concept of responsive images and delve into the techniques and best practices for effectively using them in web design. Whether you’re a seasoned developer or just starting with responsive web design, this guide will equip you with the knowledge to create visually stunning and high-performing websites.

Understanding Responsive Images

Responsive images refer to the practice of optimizing and delivering images that adapt fluidly to different viewport sizes, ensuring they look visually appealing and load efficiently across devices.

To comprehend the significance of responsive images, it’s essential to understand the challenges they address. When a non-responsive image is displayed on a smaller screen, it often appears oversized and can cause layout issues or disrupt the overall user experience. Additionally, non-optimized images can significantly impact page load speed, leading to frustrated users and potential loss of visitors.

The impact of images on page load speed cannot be underestimated. Large, unoptimized images can drastically slow down a website’s performance, leading to increased bounce rates and diminished user engagement. Therefore, optimizing images for responsive design involves not only selecting the appropriate format but also minimizing file sizes through compression techniques and employing responsive image solutions.

However, creating responsive images is not as simple as it sounds. There are several challenges that web designers and developers need to overcome, such as:

  • The art direction problem: This is the problem of displaying different cropped images for different layouts, depending on what part of the image is relevant for each device. For example, a header image that shows a group of people may need to be cropped differently for a mobile device than for a desktop device, so that the faces of the people are still visible.
  • The bandwidth problem: This is the problem of serving different image sizes for different devices, depending on their screen resolution and network speed. For example, a high-resolution image that looks sharp on a 2x display may be too large and slow to load on a 1x display or on a slow network.

Fortunately, there are some tools and techniques that can help us create responsive images using HTML and CSS. In this article, we will explore how to use features like srcset and the picture element to implement responsive image solutions on websites. We will also look at how to use vector graphics as an alternative to raster graphics for responsive images that can scale without losing quality.

Implementing Responsive Images in HTML and CSS

To bring responsive images to life in your web design, you’ll need to understand the HTML and CSS techniques that enable their seamless integration. By using the appropriate HTML markup and CSS rules, you can ensure that your images adapt flawlessly to various screen sizes and resolutions.

CSS media queries play a significant role in adjusting image size and resolution based on the viewport dimensions. By defining specific CSS rules within different media query breakpoints, images can be resized proportionally to fit the available space. For example, you can use the “max-width” property to set a maximum image width and ensure that it scales down proportionally as the viewport size decreases. By combining media queries with CSS properties like “max-width,” “width,” and “height,” web designers can create fluid and adaptive image layouts.

The “srcset” attribute is another valuable tool for delivering responsive images. It allows you to provide multiple image sources and resolutions, enabling the browser to select the most appropriate version based on the device’s capabilities. With the “srcset” attribute, you can include different image files with varying resolutions, sizes, and formats. The browser then selects the most suitable image to display, optimizing both the image quality and page load speed. This attribute is particularly beneficial for devices with high-resolution screens like Retina displays, where crisp and clear images are essential.

Additionally, the “sizes” attribute complements the “srcset” attribute by specifying image sizes based on viewport breakpoints. By using the “sizes” attribute, you can indicate the image’s display size relative to the viewport width. This information helps the browser determine the appropriate image source from the “srcset” based on the available space. The “sizes” attribute uses a syntax that includes media queries and descriptors, allowing you to define different image sizes for specific viewport ranges. This flexibility ensures that images adapt precisely to different screen sizes and resolutions.

To put this into practice, we can use the “srcset” attribute directly on the “img” element to provide multiple image sources with their respective resolutions. Additionally, you can use the “sizes” attribute to specify the image’s display size relative to the viewport width. This combination allows the browser to select the most appropriate image based on the available space.

Here’s an example of how the “img” element can be used with the “srcset” and “sizes” attributes:

<img src="image-default.jpg" srcset="image-small.jpg 480w, image-medium.jpg 768w, image-large.jpg 1200w" sizes="(max-width: 768px) 100vw, 1200px" alt="Image Illustration">

In the example above, we have defined different image sources and specified that the image should occupy 100% of the viewport width for screens up to 768 pixels wide and use a fixed width of 1200 pixels for larger screens.

A more modern option for implementing responsive images is the “picture” element. It provides a flexible and powerful way to define multiple sources for an image based on different conditions. Within the “picture” element, you can specify different “source” elements, each with its own “srcset” and “media” attributes. The “srcset” attribute lists the image sources with their respective resolutions and formats, while the “media” attribute defines the media query conditions for each source. This allows the browser to choose the most suitable image based on the viewport size and other specified criteria. To ensure compatibility with older browsers, it’s important to include a fallback “img” element within the “picture” element that specifies a default image source using the “src” attribute.

Here’s an example of how the “picture” element can be used to implement responsive images:

<picture>
    <source srcset="image-small.jpg" media="(max-width: 480px)">
    <source srcset="image-medium.jpg" media="(max-width: 768px)">
    <source srcset="image-large.jpg" media="(min-width: 769px)">
    <img src="image-default.jpg" alt="Image Illustration">
</picture>

In the example above, we define three different image sources with their respective “srcset” attributes and associated media queries. The browser will choose the appropriate image source based on the viewport width. If none of the media queries match, the “img” element’s source specified by the “src” attribute will be used as a fallback.

To complement the HTML markup, CSS plays a crucial role in setting up breakpoints and media queries for different screen sizes. By using CSS media queries, you can define specific styles for various viewport ranges, ensuring that your images adapt elegantly to each scenario. For example, you might adjust the image size, alignment, or visibility based on the viewport width.

@media (max-width: 480px) {
    /* CSS rules for small screens */
}

@media (max-width: 768px) {
    /* CSS rules for medium screens */
}

@media (min-width: 769px) {
    /* CSS rules for large screens */
}

Here we have defined CSS rules for different screen sizes using media queries. Within each media query block, you can apply specific styles to your images or other elements as needed. By combining HTML markup with the appropriate CSS rules, you can create responsive images that adapt beautifully to various devices and screen sizes.

Image Optimization for Responsiveness

Achieving optimal image performance is a critical aspect of creating responsive web designs. As images play a significant role in both visual appeal and page load speed, it’s essential to implement effective image optimization techniques. By reducing file sizes without compromising quality, web designers can ensure that responsive images load swiftly across devices while maintaining their visual integrity.

One of the primary techniques for optimizing image file sizes is compression. Image compression reduces the file size by eliminating unnecessary data while preserving the image’s visual quality. There are two types of compression: lossy and lossless. Lossy compression selectively discards data, resulting in a smaller file size but a slight reduction in image quality. Lossless compression, on the other hand, reduces the file size without sacrificing quality, making it ideal for images where visual fidelity is crucial.

To enhance image optimization further, leveraging modern image formats can significantly impact file sizes and performance. Formats like WebP and AVIF offer superior compression capabilities compared to traditional formats like JPEG and PNG. WebP, developed by Google, provides impressive compression ratios while maintaining high image quality. AVIF (AV1 Image File Format), based on the AV1 video codec, delivers even better compression efficiency. By adopting these modern formats, web designers can reduce file sizes significantly without sacrificing image clarity.

Fortunately, there are numerous tools and plugins available that streamline the image optimization process. These tools automate compression and conversion tasks, making it easier to optimize images for responsiveness. Popular tools like ImageOptim, Kraken.io, and TinyPNG offer user-friendly interfaces and batch processing capabilities, allowing you to optimize multiple images simultaneously. Content delivery networks (CDNs) and caching plugins also play a vital role in optimizing image delivery, ensuring that responsive images are served efficiently to users.

Best Practices for Responsive Images

To ensure an optimal user experience and efficient performance, it’s important to follow best practices when designing responsive images. By considering image resolutions, loading optimizations, and the specific needs of different devices, you can create responsive designs that deliver fast-loading, visually appealing content across various screen sizes.

  • Selecting Appropriate Image Resolutions and Sizes
    When choosing images for your responsive design, consider the resolution and pixel density needed for each device. Provide different image versions for different breakpoints to ensure sharp and clear visuals on all devices. Use high-resolution images for high-density displays and optimize file sizes to balance quality and performance.
  • Optimizing Image Loading
    Load times play a crucial role in user experience, particularly on mobile devices with limited bandwidth. Implement techniques such as lazy loading, which delays the loading of off-screen images until they are about to be viewed. This approach reduces initial page load times and improves performance. Additionally, leverage modern image formats like WebP or AVIF, which provide better compression and smaller file sizes compared to traditional formats like JPEG or PNG. Use responsive image optimization tools or plugins to automatically generate and serve appropriate image formats based on the user’s device capabilities.
  • Considering Needs of Different Devices
    Each device has unique characteristics and display capabilities that should be considered when designing responsive images. For mobile devices, focus on optimizing image sizes to ensure fast loading and minimize data consumption. Consider the impact of network conditions and prioritize essential visual content for smaller screens. For desktop and larger screens, provide higher-resolution images to take advantage of the available screen real estate. Use CSS media queries to define breakpoints and adjust image sizes and resolutions accordingly. Tailor the visual experience to each device category while maintaining consistency in branding and design.

These best practices can help you create responsive image designs that enhance user experience, improve performance, and adapt seamlessly to different devices. Remember to test your designs across various devices and network conditions to ensure optimal results.

Give It A Try

Responsive images are a crucial component of modern web design, allowing websites to adapt seamlessly to different devices and screen sizes. By implementing responsive image techniques, you can deliver an enhanced user experience, improve page load times, and optimize your website for search engine visibility.

By incorporating these techniques and adhering to best practices, you can ensure a visually appealing and seamless browsing experience for your users across a variety of devices. Responsive images not only enhance user satisfaction but also contribute to improved search engine rankings, as search engines prioritize websites that provide a responsive and mobile-friendly experience.

Embracing responsive image design is essential for staying ahead in the ever-evolving digital landscape. By optimizing image display, loading times, and accessibility, you can create engaging websites that captivate users and drive meaningful interactions. Start implementing responsive image techniques today to unlock the full potential of your web design and provide a superior user experience.

CSS Media Queries: The Powerhouse of Responsive Web Design

Responsive web design has become essential for providing optimal user experiences across a multitude of devices. With the increasing variety of screen sizes and resolutions, it’s crucial to ensure that your website adapts seamlessly to different devices, from desktop computers to smartphones and tablets. This is where CSS media queries come into play. By using media queries, we can apply specific styles and layout adjustments based on the characteristics of the device accessing the website. In this article, we will explore the world of CSS media queries and delve into their functionality, implementation, and best practices. Let’s dive in and discover the power of CSS media queries.

Understanding CSS Media Queries

CSS media queries serve as the backbone of responsive web design, allowing us to adapt our styles and layouts based on the characteristics of the device being used. In simple terms, media queries enable us to apply different styles to different devices, ensuring that our website looks and functions seamlessly across various screen sizes.

At its core, a media query consists of a media type and one or more expressions that evaluate to true or false. The media type specifies the category of the device, such as “screen” for a computer or “print” for printing purposes. The expressions, enclosed in parentheses, define the conditions under which the styles within the media query will be applied.

The syntax of a media query is as follows:

@media media-type and (expressions) {
    /* Styles for this specific condition */
}

With these queries can target various aspects of the device, such as its width, height, orientation, resolution, and more. For example, we can use the “max-width” feature to apply styles when the device’s width is below a certain value.

Here are some commonly used device characteristics:

  • Width and Height: Allows us to target specific device dimensions, ensuring optimal layout adjustments.
  • Orientation: Enables us to differentiate between portrait and landscape orientations, adapting our styles accordingly.
  • Resolution: Helps us apply high-resolution images and styles to devices with high DPI displays.
  • Device Aspect Ratio: Allows us to target specific aspect ratios, accommodating different screen proportions.

We can even combine these values with logical operators like “and,” “or,” and “not,” to create powerful media queries that precisely control the appearance and behavior of our web pages.

Creating Responsive Designs with Media Queries

Designing for different screen sizes and devices is a crucial aspect of modern web development. With media queries, we can tailor our styles and layouts to provide the best user experience across a wide range of devices, from small mobile phones to large desktop monitors. Let’s explore how media queries enable us to create responsive designs.

One approach is to target specific devices or device types using media queries. For example, we can apply different styles to smartphones, tablets, and desktops, ensuring that each device receives an optimized layout. By specifying media features like width or device aspect ratio, we can fine-tune our design to match the characteristics of the targeted devices.

To create responsive designs, we can adapt various aspects of our web page using media queries. This includes adjusting the layout, typography, and images. For instance, we can change the layout from a single column on mobile devices to a multi-column layout on larger screens. We can modify font sizes to ensure legibility across different screen sizes. Additionally, media queries allow us to serve appropriately sized images, reducing page load times and improving page load performance.

Media Query Breakpoints and Best Practices

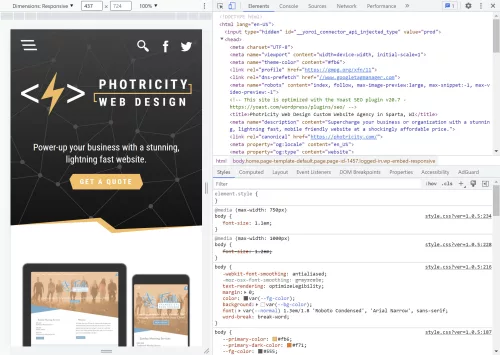
Chrome developer tools
Google Chrome’s developer tools are enormously helpful for testing your CSS media queries

When it comes to implementing media queries, choosing appropriate breakpoints is essential for achieving seamless responsiveness. Breakpoints determine at which screen sizes or device widths the styles defined in the media queries will be applied. By strategically selecting breakpoints, we can ensure that our designs adapt smoothly across different devices.

The choice of breakpoints depends on factors such as your design layout, content structure, and user experience goals. It’s important to analyze the design and identify natural breakpoints where the content or layout needs to shift to accommodate different screen sizes. For example, breakpoints can be set when transitioning from a mobile layout to a tablet layout, or from a tablet layout to a desktop layout.

While there are no fixed rules for choosing breakpoints, some commonly used breakpoints have emerged based on industry standards and device popularity. For instance, popular mobile-first breakpoints include 320px, 480px, and 768px, which correspond to the widths of smaller smartphones, larger smartphones, and small tablets, respectively. Common desktop breakpoints may include 1024px, 1280px, and 1440px, catering to larger screens.

In addition to choosing breakpoints, it’s important to follow best practices for setting up media queries. Here are a few guidelines to ensure optimal responsiveness:

  • Use a mobile-first approach: Start with the styles for mobile devices and then progressively enhance the design for larger screens by adding media queries.
  • Minimize the number of breakpoints: Too many breakpoints can complicate the design process and make maintenance challenging. Focus on key breakpoints that have a significant impact on the design.
  • Test on real devices: Use actual devices or device simulators to test your responsive design across different screen sizes and orientations. This helps ensure that your media queries are working as intended.
  • Consider fluid and flexible layouts: Instead of relying solely on fixed breakpoints, embrace fluid and flexible layouts that can adapt to various screen sizes without the need for explicit breakpoints.

Advanced Techniques with Media Queries

In addition to the standard usage of media queries based on screen sizes, CSS media queries offer advanced capabilities that allow us to target specific device features, orientations, resolutions, and even user preferences. These advanced techniques enable us to create highly customized and tailored experiences for different devices and user contexts.

One advanced technique involves using media queries to target specific device orientations. By applying different styles based on the screen orientation, we can optimize the layout and presentation of our content when the user switches between landscape and portrait modes. For example, we might want to adjust the positioning of elements or modify the typography to ensure readability in both orientations.

Media queries can also be used to target devices with specific resolutions or pixel densities. By specifying ranges for resolution or pixel density, we can provide higher-quality images or adjust the layout to accommodate devices with high DPI screens, such as Retina displays. This ensures that our designs look crisp and sharp on high-resolution screens while optimizing the file sizes of images for devices with lower resolutions.

Furthermore, media queries allow us to target devices with specific features, such as touch screens. By using feature-specific media queries, we can customize our designs to provide touch-friendly interactions or adjust the styles to enhance the touch experience. This helps create a more intuitive and engaging user interface for touch-enabled devices.

In addition, media queries also support complex conditions using logical operators. By combining multiple media features and using logical operators like AND, OR, and NOT, we can create highly precise and specific targeting. For example, we can apply styles only to devices that have a high resolution, are in portrait mode, and support touch interactions.

Implementing advanced techniques with media queries requires a deeper understanding of the available media features and their syntax. It is important to refer to the CSS specifications and documentation to explore the full range of possibilities. Additionally, testing and experimentation on various devices and user scenarios will help fine-tune and optimize the application of these advanced media queries.

Digging Deeper Into Media Queries

While media queries are enormously useful for creating responsive designs, there are many things to take into consideration, such as performance optimization, search engine optimization (SEO), and accessibility. Understanding these aspects will help us create better experiences for our users across different devices and improve the overall quality of our websites.

One consideration when using media queries is performance optimization. By applying different styles based on screen sizes, we can optimize the delivery of resources, such as images, scripts, and stylesheets. For example, we can load smaller image files or defer the loading of certain scripts for mobile devices with limited bandwidth. This helps to improve the loading speed and overall performance of our website, providing a smoother user experience.

Media queries can also have a negative impact the performance of your website if not used judiciously. Including unnecessary or overly specific media queries can lead to increased CSS file sizes and unnecessary rendering on devices that don’t require those styles. It is crucial to strike a balance between flexibility and performance by optimizing and organizing your media queries.

Media queries also play a role in SEO. As search engines increasingly prioritize mobile-friendly websites, having responsive designs becomes crucial. By using media queries to create responsive layouts, we ensure that our website adapts and displays properly on various devices. This can positively impact our search engine rankings and improve our website’s visibility in search results.

In terms of accessibility, media queries enable us to provide tailored experiences for users with different accessibility needs. By using media queries to adjust font sizes, contrast ratios, and other design elements, we can enhance readability and usability for individuals with visual impairments or other accessibility requirements. It is important to consider accessibility guidelines and best practices when implementing media queries to ensure inclusivity and equal access for all users.

Now Make It Happen

Media queries are powerful tools in the realm of responsive web design. By leveraging media queries, you can create websites that adapt and provide optimal experiences across various devices and screen sizes.

As technology evolves and the range of devices continues to expand, media queries will remain a critical aspect of web development. Embracing the potential of media queries and staying up to date with best practices will enable you to deliver exceptional user experiences and keep your website ahead of the curve.

So, go ahead and experiment with media queries, fine-tune your responsive designs, and create websites that seamlessly adapt to the diverse digital landscape. With media queries as your ally, you can unlock the full potential of responsive web design.

SVG: The Power of Scalable Vector Graphics in Web Design

Scalable Vector Graphics (SVG) is an open vector image format used in web design. It is a widely popular format that is supported by all modern web browsers. SVG graphics are vector images, which means they are made up of paths and shapes. This makes them scalable and resolution-independent, which means they can be scaled up or down without losing any quality or clarity. This is why SVG graphics are an ideal choice for responsive web design.

SVG images are created using XML code. This means that they are easy to edit and manipulate. SVG graphics can be edited using a text editor or a dedicated vector graphics editor like Adobe Illustrator or Inkscape.

Using SVG graphics offers a great benefit in improving website performance. Compared to traditional image formats like JPEG or PNG, SVG files tend to be much smaller in size. This is because SVG graphics are vector-based and can be scaled without losing quality, unlike raster images which can become pixelated when enlarged. SVG graphics can also be compressed without becoming distorted, further reducing their file size. This makes them ideal for websites and web applications where page load speed is crucial. Additionally, because SVG graphics are code-based, they can be cached and reused, reducing server requests and improving overall performance.

CSS can be used to style SVG graphics just like any other HTML element. You can apply styles to the SVG element itself or to its child elements, such as paths, circles, and rectangles. You can use CSS properties like fill, stroke, stroke-width, opacity, and transform to change the appearance of your SVG graphics.

SVG graphics are not only versatile and scalable but can also be animated and interactive, making them an excellent choice for creating engaging and dynamic web designs. With SVG, it’s possible to add animations such as fades, transitions, and rotations, allowing designers to create visually appealing and interactive elements on their web pages. SVG animations can be achieved using CSS or JavaScript, making it easy to incorporate them into any web project. Additionally, web designers can create interactive elements such as clickable buttons, hover states, and more, making their designs even more engaging and user-friendly.

SVG isn’t the only image format you will ever need. For highly detailed images such as photos, you’re better off sticking with a raster format. But here are some areas where SVG’s shine:

  • Icons: SVG graphics are often used to create icons and other small, simple graphics that are used to represent different functions or actions.
  • Logos: SVG’s are great for creating logos and other branding and marketing materials.
  • Illustrations: The SVG format is perfect for colorful illustrations and lineart.
  • Charts and graphs: SVG graphics can be used to create charts, graphs, maps, and infographics, which are a great way to present data in a visually appealing and easy-to-understand way.
  • Decorative elements: Use SVG to add style to your site with decorative designs and shapes.
  • Patterns and backgrounds: Designers can create unique and interesting patterns and backgrounds that add visual interest and depth to a website.
  • Animations: SVG graphics can be used to create animations, and to add interest and interactivity to a website.

When it comes to using SVG graphics in web design, there are a few things to keep in mind. It’s important to optimize the SVG file for web use. This involves removing unnecessary code and compressing the file size. And since SVG’s are code-based rather than pixel-based, you should test your SVG files in all major web browsers to make sure they display correctly.

Another important consideration when using SVG graphics in web design is accessibility. It is important to ensure that the SVG graphics are accessible to all users, including those using assistive technologies like screen readers. This involves providing alternative text descriptions and ensuring that the SVG graphics are properly labeled.

If you are looking for a powerful and versatile tool for creating graphics for the web, then SVG is a great option. It offers many benefits, including smaller file sizes, scalability, and the ability to be animated. However, it is important to properly optimize and embed SVG graphics, as well as ensure their accessibility, to ensure the best user experience for all users.

User Experience: Tips and Best Practices for UX Design

User experience (UX) design is the process of enhancing user satisfaction with a product by improving the ease of use, efficiency of navigation, and pleasure provided in the user’s interaction with it. It is a critical component of web design, as it can make the difference between a website that is easy to use and navigate, and one that is frustrating and confusing. Good UX design ensures that visitors to a website can find the information they are looking for quickly and easily, and that they have a positive experience while using the site.

There are many different UX design principles, but here are just a few tips and best practices for improving the user experience on your website.

Simplicity

  • Less is More: The user interface should be easy to understand and use, without clutter and overwhelming visuals that don’t add value. Visitors should be able to quickly find what they are looking for and complete their tasks without having to think too much.
  • Clear Navigation: The navigation menu should be easy to locate and use. Make sure the menu items are clear, concise, and organized in a logical order.
  • Clarity of Purpose: The website should have a clear purpose and be easy to understand. Visitors should be able to quickly determine what the website is about and what they can do on it.
  • Clear and Concise Language: Avoid using jargon or technical terms that your users may not understand. Keep your sentences short and to the point.

Functionality

  • Mobile Optimization: With the increasing use of mobile devices, it’s crucial to design websites that are mobile-friendly. The website should be responsive, meaning it should adjust to different screen sizes.
  • Readability: The website should have a legible font and font size, with appropriate spacing and contrast between the text and background. It’s best to avoid using too many fonts and font sizes on the website.
  • Minimize Load Time: The website should load quickly, as users tend to lose interest if a website takes too long to load. Optimize images and videos and use efficient code to minimize load time.
  • Accessibility: Make sure the website is accessible to everyone, including those with disabilities. Use alt tags for images, and provide captions for videos.
  • Feedback: Provide visual feedback to users after they take any action on the website, such as filling out a form or clicking a button. This feedback assures the user that their action was successful.

Aesthetics

  • Attractive Design: The website should be visually appealing. The design should be consistent with the brand identity of the company or organization, and it should be easy on the eyes.
  • Use white space effectively: White space is important for creating a sense of balance and order on your website.
  • Consistent Design: A uniform design language throughout the website is essential to ensure that users can quickly understand the purpose of each page. Use consistent typography, colors, and spacing to maintain a cohesive design.
  • High-quality Media: Images and videos can help to break up text and make your website more visually appealing. They can also help to tell a story or illustrate a point.

A/B testing is a great way to improve UX design. By testing different variations of a website, web designers can see what works best for users and make improvements accordingly. For example, a web designer could test different headline styles, call to action buttons, or landing page layouts to see which one results in the most conversions.

These tips and best practices can help create a better user experience on your website. A good UX design is essential to ensure that users enjoy their experience on your website, and keep coming back for more.

Supercharging Web Design with JavaScript

JavaScript is a powerful tool that can be used to add interactivity and dynamic functionality to web design. It is a programming language that is widely used in web development, and has become an essential tool for creating engaging, interactive websites. JavaScript can be used to create animations, add form validation, create responsive designs, and much more.

One of the most common uses of JavaScript in web design is for creating animations and effects. This can include scrolling effects, hover effects, and other dynamic animations that can make a website more visually appealing and engaging. JavaScript can also be used to create responsive designs that adjust to different screen sizes and orientations.

Another important use of JavaScript in web design is for form validation. JavaScript can be used to validate user input on web forms, ensuring that data is entered correctly and preventing errors that could cause frustration for users. This can include checking for required fields, validating email addresses and phone numbers, and ensuring that passwords meet certain requirements.

JavaScript can also be used to create interactive elements on a website, such as sliders, tabs, lightboxes, and other types of user interface elements. This can make it easier for users to navigate a website and find the information they need. JavaScript can even be used to build web apps, browser-based games, and other interactive experiences on a website, making it possible to create engaging and entertaining content that keeps users coming back.

Here are some additional tips for using JavaScript in web design:

  • Use JavaScript sparingly. Too much JavaScript can slow down your website and make it less user-friendly.
  • Use JavaScript to add value to your website. Don’t use JavaScript just for the sake of using it. Make sure that the JS you add is actually adding value to your website.
  • Use progressive enhancement: Progressive enhancement is a technique that involves using JavaScript to add features to a web page, but not requiring it for the site to function properly. This ensures that users who do not have JavaScript enabled can still view and use the web page.
  • Test your JavaScript thoroughly. Make sure that your code is working properly without any errors before you publish your website.
  • Keep your JavaScript up-to-date. JavaScript is constantly evolving, so make sure that you are using the latest version of JavaScript.
  • Use a JavaScript framework. A JavaScript framework is a collection of pre-written code that can help you to create interactive web pages more quickly and easily. Some popular JavaScript frameworks include jQuery, React, Angular, and Vue.
  • Document your JavaScript with instructional comments. This will make it easier for you to maintain your code in the future.

Overall, JavaScript is an incredibly versatile tool that can be used in many different ways in web design. Whether you’re looking to create animations, add form validation, or create interactive elements, JavaScript can help you achieve your goals and create websites that are engaging, interactive, and easy to use. With its broad range of capabilities, it’s no wonder that JavaScript has become such an essential part of modern web design.

Modernize Your Website Layouts With CSS Grid

Have you ever struggled with designing a responsive layout for your website? If so, CSS Grid might just be the solution you’re looking for! Here we’ll explore what the CSS grid system is, how it works, and why it’s such a powerful tool for web designers.

CSS Grid is a two-dimensional layout system that allows you to create complex, responsive layouts with ease. Part of the CSS3 standard, it allows you to define a grid of columns and rows, and then place elements anywhere within that grid. This means you can create layouts that adapt to different screen sizes, without having to write complicated media queries or rely on other layout systems.

One of the biggest advantages of CSS Grid is its flexibility. You can define a grid with any number of columns or rows, and you can even define different sized columns and rows. This means you can create layouts that are truly unique, and that stand out from the crowd.

Another plus of CSS Grid is its simplicity. Once you understand the basics of how it works, creating complex layouts becomes much easier. You no longer have to worry about floats, clears, tables, libraries, or other CSS hacks that were necessary in the past.

It’s hard to justify not using CSS Grid

So how does CSS Grid work? There’s a lot to it, but it’s actually quite simple. First, you define a grid container by setting its display property to “grid”. Then, you define the columns and rows of the grid using the “grid-template-columns” and “grid-template-rows” properties. Finally, you place elements within the grid using the “grid-column” and “grid-row” properties.

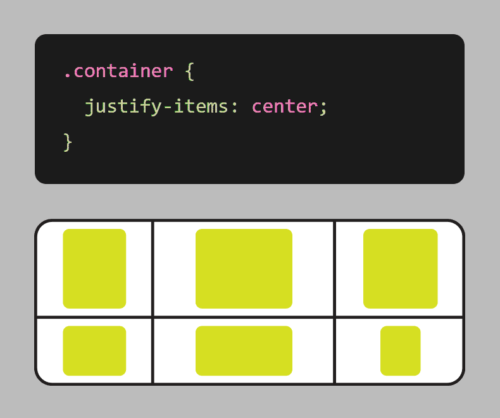
Grid also comes with a number of other useful features, such as the ability to span elements across multiple columns or rows, and the ability to align elements within the grid.

Here’s an example of using CSS grid to create a responsive layout:

.container {
    display: grid;
    grid-template-columns: repeat(auto-fit, minmax(250px, 1fr));
    grid-gap: 20px;
}

In this example, we first define a container element with the display property set to grid. We also set the grid-template-columns property to create a grid with columns that will automatically adjust based on the available space, with a minimum size of 250px and a maximum size of 1fr (which means the column will take up as much available space as possible).

We also use the grid-gap property to add some spacing between the boxes.

With these styles in place, the grid will adjust and reflow as the browser window is resized, ensuring that the items are always displayed in an organized, responsive manner.

It’s worth noting that CSS Grid is different from CSS Flexbox, another popular layout system. While Flexbox is great for laying out elements in a single row or column, Grid is more suited for creating complex, two-dimensional layouts. With Flexbox, you define a row or column, and then place elements within that row or column. With Grid, you define a grid of rows and columns, and then place elements anywhere within that grid. This makes it more powerful for complex layouts, while Flexbox is better suited for simpler, one-dimensional layouts.

CSS Grid is a powerful tool that allows you to create complex, responsive layouts with ease. Its flexibility and simplicity make it an essential tool for any web designer looking to create beautiful, responsive websites. So why not give CSS Grid a try? Your website (and your users) will thank you!