Converting an HTML Page to a WordPress Theme

Are you looking to take your website development skills to the next level and build your own WordPress theme? If you’ve already created an HTML prototype page, you’re halfway there! In this guide, we will walk you through the process of converting your static HTML prototype into a fully functional and customizable WordPress theme. By harnessing the flexibility and extensibility of WordPress, you’ll be able to create stunning and dynamic websites with ease. Whether you’re a seasoned developer or just starting out, this article will provide you with the knowledge and tools to craft your very own WordPress theme. Get ready to embark on an exciting journey where your HTML prototype evolves into a powerful and engaging website powered by WordPress.

Understanding the Structure of a WordPress Theme

To successfully transform your HTML prototype into a WordPress theme, it’s essential to grasp the structure and components of a WordPress theme to be able to organize your code effectively and leverage the full potential of WordPress.

Basic Components of a WordPress Theme:
At its core, a WordPress theme is build with PHP and consists of various files and directories that define the layout, design, and functionality of your website. The key components include:

  • style.css: This file holds the essential information about your theme, such as its name, author, version, as well as visual styling.
  • index.php: Serving as the main template file, it controls the overall structure of your theme.
  • header.php and footer.php: These files contain the header and footer sections of your theme, providing consistency across multiple pages.
  • functions.php: This file allows you to add custom functions and modify the default behavior of your theme.

File Structure and Hierarchy:
WordPress follows a hierarchical structure for loading template files. Understanding this hierarchy is crucial to ensure that the correct templates are used for different types of content. The primary template file, index.php, serves as the fallback when more specific templates are not available, such as page.php, which would be used to display individual pages instead of the index.php file. Some other commonly used template files include:

  • single.php: Used for displaying individual posts.
  • archive.php: Used for displaying date-based archive pages.
  • category.php: Used for displaying category archive pages.
  • tag.php: Used for displaying tag archive pages.
  • search.php: Used for displaying search results.
  • 404.php: Used for displaying the “Page Not Found” error page.

Take some time to study the default themes included with WordPress to see how a theme can be structured and organized. By comprehending the structure and hierarchy of a WordPress theme, you’ll be able to organize your files efficiently and leverage the flexibility offered by the platform. Now it’s time to dive deeper into the process of converting your HTML prototype into a WordPress theme, taking advantage of this structure and hierarchy.

Analyzing and Preparing the HTML Prototype

Part of the process of creating a WordPress theme is analyzing your existing HTML prototype to ensure its compatibility with the WordPress structure. This step will save you time and effort in the long run. Here are a few key considerations:

  • Review your HTML prototype and identify any WordPress-incompatible elements or features. For example, check if the prototype relies on static file paths or includes hardcoded content that should be dynamic in a WordPress theme. Assessing these factors early on will help you plan the necessary adjustments and modifications.
  • Look for components or sections within your HTML prototype that can be reused across multiple pages or posts. These could include headers, footers, navigation menus, sidebars, and more. Identifying these reusable elements will allow you to create separate template files, making your theme more modular and easier to manage.
  • Take note of any design patterns or recurring elements in your HTML prototype. These could include typography styles, color schemes, button designs, or other visual elements. By documenting these common elements, you can create consistent stylesheets and reusable CSS classes, ensuring a cohesive look and feel throughout your WordPress theme.

Analyzing and preparing your HTML prototype for WordPress compatibility sets the stage for a smoother transition into theme development.

Enqueuing Stylesheets and Scripts

To ensure proper loading and management of stylesheets and scripts in your WordPress theme, it’s a best practice to enqueue them using WordPress functions. Enqueuing allows you to add external stylesheets, custom styles, and JavaScript files in a way that is compatible with WordPress and avoids conflicts with other themes or plugins. Let’s explore the process:

Enqueuing Stylesheets:
If your HTML prototype includes custom CSS styles, you can create a new stylesheet specifically for your WordPress theme. Name it style.css and place it in the root directory of your theme.

Open the functions.php file of your theme and locate the appropriate section for enqueuing stylesheets. Utilize the wp_enqueue_style() function to enqueue your stylesheets. This function takes parameters such as a handle (a unique ID for your stylesheet), the path to the stylesheet file, and any dependencies if needed. For example:

   function enqueue_theme_stylesheets() {
       wp_enqueue_style( 'theme-style', get_stylesheet_uri() );
   }
   add_action( 'wp_enqueue_scripts', 'enqueue_theme_stylesheets' );

This enqueues a stylesheet using the get_stylesheet_uri() function, which automatically retrieves the path to the current theme’s default stylesheet.

Enqueuing Scripts:
If your HTML prototype includes JavaScript functionality, you can enqueue scripts as well.

Similar to enqueuing stylesheets, open the functions.php file and locate the appropriate section for enqueuing scripts. Use the wp_enqueue_script() function to enqueue your scripts. Enter parameters for the handle, the path to the script file, and any dependencies if necessary. For example:

   function enqueue_theme_scripts() {
       wp_enqueue_script( 'theme-script', get_template_directory_uri() . '/js/scripts.js', array( 'jquery' ), '1.0', true );
   }
   add_action( 'wp_enqueue_scripts', 'enqueue_theme_scripts' );

Now we’ve enqueued a script using the get_template_directory_uri() function to retrieve the path to the theme’s directory and concatenating it with “/js/custom.js”, which specifies the path to the custom JavaScript file. It also specifies “jquery” as a dependency, ensuring that the jQuery JavaScript library is loaded before the custom script. The 1.0 value represents the version number of the script, and the “true” parameter indicates that the script should be placed in the footer for optimal performance.

Properly enqueuing stylesheets and scripts in your WordPress theme ensures that they are loaded efficiently and in the correct order. This practice enhances the performance and compatibility of your theme with various browsers and devices.

Converting HTML Markup into Dynamic WordPress Code

One of the key advantages of WordPress is its ability to dynamically generate and display content. To convert your static HTML prototype into a fully functional WordPress theme, you’ll need to incorporate the WordPress loop and replace static elements with dynamic WordPress functions. Let’s explore the process:

  • Understanding the WordPress Loop:
    The WordPress loop is a fundamental concept that retrieves and displays posts or other content from your WordPress database. It iterates through each post, allowing you to customize the display of individual items. Using the loop, you can easily generate dynamic content for your theme.
  • Replacing Static Elements:
    Identify the static HTML elements in your prototype that should display dynamic content, such as blog posts, comments, or custom post types. Replace these elements with appropriate WordPress functions that utilize the loop to fetch and display the content.
  • Displaying Post Content:
    To display the content of a post, you can use the_content() function within the loop. This function retrieves the main content of the current post and outputs it onto the page. You can place this function within the appropriate location in your theme’s template files to display the post content dynamically.
  • Listing Posts:
    If you want to display a list of posts, such as on a blog page or archive page, you can use the have_posts() and the_post() functions in combination with other template tags. The have_posts() function checks if there are any posts to display, while the_post() function sets up the current post for iteration within the loop. You can then use template tags like the_title() or the_excerpt() to output the relevant information for each post.
  • Customizing Output:
    WordPress offers a wide range of template tags and functions to customize the output of dynamic content. For example, you can use functions like the_permalink() to generate the URL for a post, the_author() to display the post author’s name, or the_time() to show the publication date.

Here’s an example of a simple WordPress loop that you can use as a starting point:

<?php
if ( have_posts() ) { // If posts are found
    while ( have_posts() ) {
        the_post();
        ?>
        <!-- The template for generating each post -->
        <article <?php post_class(); ?>>
            <h2><a href="<?php the_permalink(); ?>"><?php the_title(); ?></a></h2>
            <div class="entry-content">
                <?php the_content(); ?>
            </div>
        </article>
        <?php
    }
} else { // If no posts are found
    echo 'No posts found.';
}
?>

In this example, we first check if there are any posts available using the have_posts() function. If there are posts, we enter the loop and use the the_post() function to set up the current post. Inside the loop, we can access various template tags to display dynamic content.

This example provides a basic foundation for understanding and implementing the WordPress loop. Feel free to customize it further based on your specific requirements and desired design.

Integrating Custom Fields and Theme Options
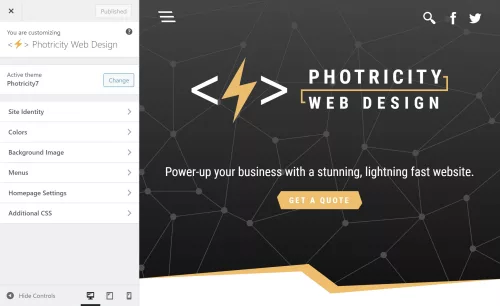
The WordPress Theme Customizer

On top of the core functionality of WordPress, you can further enhance the flexibility and customization of your theme by integrating custom fields and theme options. These powerful features allow you to add editable content sections and provide additional control over various aspects of your theme. Two key methods for achieving this are the WordPress Customizer and custom fields.

Using the WordPress Customizer for Theme Options
The WordPress Customizer provides a user-friendly interface for managing theme options. It allows users to customize various aspects of the theme, such as site title, logo, colors, and more. By leveraging the Customizer, you can provide users with the ability to personalize their website without touching any code.

To add theme options via the Customizer, you need to register a new section and add controls for each option. The registered options can then be accessed and applied to your theme’s templates. For example, you can create options for selecting a font style, choosing a layout, or even adding custom text.

Implementing Custom Fields for Editable Content
Custom fields offer a powerful way to add editable content sections to your theme. With custom fields, you can define specific areas within your theme where users can input dynamic content, such as a featured image, a banner text, or a call-to-action button. These fields provide a seamless way to update and manage content without modifying the theme’s core files.

To easily implement custom fields, you can use WordPress plugins like Advanced Custom Fields or Custom Field Suite. These plugins provide an intuitive interface for creating and managing custom fields. Once defined, you can retrieve the values of these fields within your theme’s templates and display them dynamically. This level of customization goes a long way in creating a unique and tailored experience for your website visitors.

Implementing Navigation Menus and Widgets

To provide seamless navigation and enhance the user experience, it’s essential to implement navigation menus and widget areas in your WordPress theme. Navigation menus allow users to navigate through different sections of your website, while widget areas provide dynamic content placement options. Let’s explore how to incorporate these elements into your theme.

Adding Custom Navigation Menus
WordPress provides a built-in functionality for creating custom navigation menus. With custom menus, you can define specific menu locations and assign menu items to them. This gives you full control over the structure and arrangement of your theme’s navigation.

To add a custom navigation menu, you need to register a menu location in your theme’s code and assign it to a specific menu location within the WordPress dashboard. You can then style and customize the menu appearance using CSS to match your theme’s design.

Incorporating Widget Areas
Widget areas, or sidebars, are regions within your theme where users can add and arrange various widgets. Widgets are pre-built elements that can display different types of content, such as recent posts, categories, tags, search forms, social media icons, and more.

To incorporate widget areas into your theme, you’ll need to register one or more widget areas in your theme’s functions.php file. Once registered, users can add and customize widgets in these designated areas using the WordPress Widgets settings. Widget areas are often placed in sidebars, footers, or any other section of your theme where you want to provide dynamic content placement options.

Implementing navigation menus and widget areas gives users the ability to navigate your website easily and customize its content placement. This flexibility allows them to personalize their browsing experience and access relevant information efficiently.

Testing and Debugging the WordPress Theme
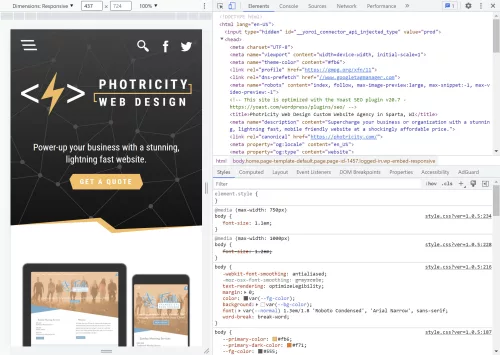
Browser testing with Chrome’s developer tools

Throughout the development of your WordPress theme, it’s crucial to conduct thorough testing to ensure a seamless user experience across various devices, browsers, and operating systems. Additionally, identifying and resolving any potential issues or bugs will contribute to the overall stability and performance of your theme.

Cross-Device and Cross-Browser Testing
To reach a wide audience, your WordPress theme should be responsive and compatible with different devices, including desktops, laptops, tablets, and smartphones. Test your theme on various screen sizes and resolutions to ensure proper rendering and functionality. Pay attention to navigation menus, content layout, and media responsiveness.

Similarly, testing your theme on different browsers (such as Chrome, Firefox, Safari, and Edge) will help identify any browser-specific issues. Ensure that your theme appears consistent and functions correctly across these browsers, considering differences in rendering and CSS support.

Functionality Testing
Thoroughly test the functionality of your theme by interacting with all its features, including menus, navigation links, search functionality, forms, and any custom functionality or plugins integrated into the theme. Verify that everything works as expected and that user interactions produce the desired results.

Test different scenarios, such as submitting forms, navigating between pages, and accessing various content types (such as blog posts, archives, and custom post types). Validate that all dynamic elements, such as post excerpts, featured images, and custom fields, display correctly and reflect the intended content.

There are some helpful plugins available that can scan your theme to identify issues, and help you to follow coding best practices. “Theme Check” and “Theme Sniffer” are two that I’ve found enormously helpful.

Error Handling and Debugging
During testing, closely monitor for any error messages, warnings, or unexpected behavior. WordPress provides useful debugging tools that can assist in identifying and resolving issues. Enabling WP_DEBUG in your WordPress configuration file (wp-config.php) helps to display error messages and warnings, facilitating the debugging process.

Inspect the browser console for any JavaScript errors and review the PHP error logs to capture any server-side issues. Addressing these errors promptly will ensure a smooth user experience and prevent potential security vulnerabilities.

Launch

Congratulations! You have journeyed through the process of transforming an HTML prototype into a fully functional WordPress theme. Creating your own WordPress theme allows you to unleash your creativity, tailor your website’s appearance and functionality to your specific needs, and provide a unique experience for your visitors. By combining the flexibility of HTML with the power of WordPress, you have the ability to build dynamic, interactive, and personalized websites.

Remember, the key to a successful WordPress theme lies in continuous improvement and refinement. Regularly update and enhance your theme to meet the evolving needs of your website and its users. Stay informed about the latest trends and best practices in WordPress development, and leverage the vast resources and supportive community to expand your knowledge and skills.

Now it’s time to take your newly created WordPress theme and launch your website. Embrace the boundless opportunities that WordPress offers, express your creativity, and make your mark on the world.

The Plethora of Possibilities that PHP Provides

Prepare to plunge into the profound paradigm of PHP, a programming powerhouse that presents a plethora of practical and prolific possibilities. In this practical post, we peruse the immense power and potential that PHP provides to programmers of all proportions. From its robust frameworks and seamless integration with databases to its security measures and e-commerce capabilities, PHP prevails as a force to be reckoned with in the realm of web development. Join us as we unravel the many opportunities and unveil the plethora of possibilities that PHP brings to the table. Whether you’re a seasoned developer or a curious beginner, this article will equip you with valuable insights and knowledge to harness the true potential of PHP. So, let’s proceed with this exciting pilgrimage together and explore the multifaceted world of PHP.

Preparing for the Powerhouse of PHP

When it comes to server-side scripting languages, PHP stands tall as a powerhouse that has shaped the modern web. With its versatile and dynamic nature, PHP opens up a world of possibilities for developers and businesses alike. In this part, we dive deeper into understanding the true essence of PHP and the incredible potential it possesses.

PHP, which stands for Hypertext Preprocessor, boasts an array of key features that make it a top choice for web development projects. Its simplicity and ease of use allow developers to quickly grasp its syntax and start building robust applications. Plus, PHP offers extensive database support, enabling seamless integration with popular database management systems like MySQL. This capability empowers developers to create dynamic and data-driven websites and applications.

The popularity of PHP is evident in its usage statistics, with millions of websites and applications powered by this versatile language. From small personal blogs to enterprise-level applications, PHP caters to diverse needs and scales effortlessly. Its compatibility with different operating systems and web servers adds to its flexibility and makes it an ideal choice for various hosting environments.

PHP’s Preeminence in Powering Dynamic Web Pages

When it comes to web development, PHP proves itself as one of the preeminent programming languages. Its versatility and ease of use have made it a go-to choice for building dynamic and interactive web pages. In this pile of paragraphs, we’ll explore how PHP excels in server-side scripting and its compatibility with various databases and content management systems (CMS).

Server-Side Scripting: PHP performs perfectly in the realm of server-side scripting, enabling developers to generate dynamic content and interact with databases and other resources. With PHP, you can seamlessly embed PHP code within HTML, allowing you to mix dynamic functionality with static web pages. This makes it possible to create personalized user experiences, process form data, authenticate users, and perform other server-side tasks.

PHP’s syntax is intuitive and straightforward, making it accessible to developers of all skill levels. It offers a vast array of built-in functions and libraries that simplify common web development tasks, such as handling file uploads, sending email, working with dates and times, and performing string manipulations.

Compatibility with Databases: PHP’s compatibility with various databases is one of its strengths. Whether you’re working with MySQL, MongoDB, SQLite, or other popular database systems, PHP provides robust database connectivity options. It offers APIs and extensions that allow seamless integration and efficient querying of databases, making it easier to store, retrieve, and manipulate data.

Plus, PHP frameworks like Laravel, Symfony, and CodeIgniter provide a solid foundation for building web applications with advanced features and scalability.

By harnessing PHP’s server-side scripting capabilities and its compatibility with databases and CMS platforms, developers have the tools at their disposal to create dynamic, data-driven websites that cater to a variety of needs. Tap into the vast PHP ecosystem and unlock new dimensions of web development prowess.

PHP and Performance Proficiency

In the world of web development, performance is paramount. Visitors expect fast-loading web pages and seamless user experiences. PHP, being a versatile and powerful language, offers various optimization techniques to ensure optimal website performance.

Caching Mechanisms in PHP: Caching is a crucial aspect of performance optimization. By storing frequently accessed data in a cache, you can significantly reduce the load on your server and improve response times. PHP provides several caching mechanisms, including in-memory caching with tools like Memcached and Redis. These caching solutions enable you to store data in memory, eliminating the need for repeated database queries or expensive computations.

Additionally, PHP frameworks and CMS platforms often come with built-in caching features. These caching systems generate static HTML files or cache the output of dynamic pages, serving them to subsequent visitors without the need for extensive processing.

Optimization Practices: Alongside caching, there are various optimization practices you can employ to enhance PHP performance. These include:

  • Code Optimization: Writing efficient and optimized code plays a crucial role in improving PHP performance. This involves techniques such as minimizing the use of global variables, reducing function calls, and optimizing loops and conditionals.
  • Database Optimization: When working with databases, optimizing queries, using proper indexing, and minimizing unnecessary database calls can have a significant impact on performance. PHP provides tools and libraries to interact with databases efficiently, allowing you to optimize queries and manage database connections effectively.
  • Resource Management: Proper resource management is essential to prevent memory leaks and optimize performance. PHP offers features like garbage collection and resource cleanup to ensure efficient memory utilization.

Protecting your Precious Property with PHP’s Prudent Privacy

PHP personified as a powerful protagonist protecting the people

When it comes to web development, security is of paramount importance. PHP provides a range of security measures and best practices to help safeguard your applications and protect your valuable assets.

Common Security Vulnerabilities: Understanding the common security vulnerabilities in PHP is essential for building secure applications. Some of the vulnerabilities you need to be aware of include:

  • Cross-Site Scripting (XSS): XSS attacks occur when malicious scripts are injected into web pages, compromising the security of users’ browsers. PHP provides built-in functions like htmlspecialchars to sanitize user input and help prevent XSS attacks.
  • SQL Injection: SQL injection attacks occur when an attacker manipulates SQL queries to gain unauthorized access to a database. Preventing SQL injection involves using parameterized queries or prepared statements and validating user input.
  • Session Hijacking: Session hijacking involves an attacker stealing a user’s session data to impersonate them. PHP offers session management mechanisms and functions like session_regenerate_id to prevent session hijacking.

Best Practices in PHP Development: Following best practices is crucial for maintaining the security of your PHP applications. Some essential practices to consider include:

  • Input Validation: Always validate and sanitize user input to prevent malicious data from compromising your application.
  • Password Hashing: Store passwords securely by using strong hashing algorithms like bcrypt or Argon2. Avoid storing plain text passwords or using weak encryption methods.
  • Secure File Uploads: Implement measures to prevent unauthorized execution of uploaded files. Validate file types, set appropriate file permissions, and store uploaded files in a secure location.
  • Error Handling and Logging: Proper error handling and logging help identify and address potential vulnerabilities or security breaches. Displaying detailed error messages to users should be avoided to prevent sensitive information leakage.

Powering the Publishing Populace: PHP for CMS

WordPress

PHP’s versatility and flexibility have made it a popular choice for developing content management systems (CMS). PHP excels in powering CMS platforms, such as WordPress, Drupal, and Joomla.

PHP-based CMS Platforms: PHP serves as the backbone for several leading CMS platforms, enabling the creation and management of dynamic websites and content. Let’s take a closer look at some popular PHP-based CMS platforms:

  • WordPress: Known for its user-friendly interface and extensive plugin ecosystem, WordPress powers millions of websites worldwide. Its core functionality, themes, and plugins are built using PHP, allowing users to easily create, publish, and manage content.
  • Drupal: Drupal is a robust CMS platform that offers powerful content management features and extensive customization capabilities. Built on PHP, Drupal enables the development of highly scalable and flexible websites, making it a preferred choice for complex projects.
  • Joomla: Another PHP-based CMS, Joomla provides a balance between ease of use and flexibility. It offers a wide range of built-in features, templates, and extensions, making it suitable for both simple websites and more sophisticated applications.

Extending CMS Functionality with PHP: One of the strengths of PHP-based CMS platforms is their ability to be extended and customized through PHP code. This allows developers to tailor CMS functionality to specific requirements. Here are some ways to leverage PHP for extending CMS functionality:

  • PHP Plugins: CMS platforms offer plugin architectures that allow developers to create and integrate custom PHP plugins. These plugins can add new features, enhance existing functionality, and integrate with external services and APIs.
  • Theme Development: PHP plays a vital role in developing custom themes for CMS platforms. By writing PHP code within theme templates, developers can control the presentation and behavior of websites, creating unique designs and layouts.

Pool of Proficient Professionals: PHP’s Passionate Public

In addition to its technical capabilities, PHP boasts a vibrant and supportive community that plays a significant role in its continuous growth and evolution. This programming powerhouse possesses a wealth of resources, forums, and developer communities that make PHP a thriving ecosystem for developers.

  • Accessible Online Resources: The PHP community has contributed to an abundance of online resources that cater to developers of all skill levels. From official documentation to tutorials, blogs, and video courses, there is a wealth of information available to learn and enhance PHP development skills. Online platforms like PHP.net, which serves as the central hub for PHP documentation, provide comprehensive and up-to-date resources.
  • Developer Forums and Communities: PHP’s popularity has fostered the creation of vibrant online communities and forums where developers can connect, seek guidance, and share knowledge. These platforms, such as Stack Overflow, Reddit’s PHP community, and PHP Freaks, allow developers to ask questions, exchange ideas, and find solutions to coding challenges. Engaging with these communities not only helps developers expand their knowledge but also provides opportunities for collaboration and networking.

The collective knowledge and passion of the PHP community make it an invaluable resource for developers. Whether you are a beginner seeking guidance or an experienced developer looking to stay current with PHP’s evolving landscape, the supportive PHP community ensures you have access to the assistance and resources needed to thrive.

Deploy the Potency of PHP

As you embark on your PHP journey, remember to continually expand your knowledge and stay connected with the thriving PHP community. Take advantage of the numerous learning materials, tutorials, and documentation available to enhance your skills and keep up with the latest trends.

By harnessing the power of PHP, you open yourself to a world of possibilities. From building dynamic web pages to creating custom plugins and extending CMS functionality, PHP empowers you to bring your ideas to life. Its flexibility, performance optimization techniques, and robust security measures ensure that your projects are not only efficient but also safeguarded.

So, ponder the plentiful possibilities that PHP produces. Plunge into its prodigious panorama, partake in the proliferation of frameworks and CMS platforms, and persistently polish your proficiencies. With PHP, you possess the potential to produce captivating web apps, prepare peerless user experiences, and propel towards your paramount development pursuits.

Protecting Your WordPress Site From Hackers

Securing your WordPress website is crucial for protecting your online presence, data, and reputation. With over 40% of websites using WordPress, it is a popular target for hackers looking to exploit vulnerabilities and gain unauthorized access. The consequences of a security breach can be severe, ranging from data theft and website defacement to reputation damage and legal liabilities. In this article, we will provide an overview of the common types of attacks and outline actionable steps to help you protect your WordPress website from attackers.

Types of Attacks

WordPress websites are often targeted by hackers due to their popularity and the vast number of websites built on the platform. Common types of attacks include:

  • Brute Force Attacks: In this type of attack, hackers use automated tools to guess usernames and passwords to gain access to the site.
  • SQL Injection Attacks: This type of attack targets the site’s database, allowing the hacker to manipulate, delete, or extract data.
  • Cross-Site Scripting (XSS) Attacks: This type of attack injects malicious code into a website, which can then be executed by unsuspecting users who visit the site.
  • Malware Infections: Hackers can use malware to gain access to the site or infect visitors’ devices with viruses or other malicious software.
  • Denial of Service (DoS) Attacks: These attacks overwhelm a website with traffic, making it inaccessible to legitimate users.

It is important to take steps to protect your website from these and other types of attacks.

Keep WordPress and Plugins Updated

Keeping your WordPress website and its plugins updated is one of the most important ways to protect it from potential vulnerabilities. Hackers can easily exploit known security weaknesses in outdated software to gain access to your website and sensitive data. It’s essential to update your WordPress core, themes, and plugins regularly to avoid security breaches.

To update WordPress, simply go to the Dashboard and click on the “Updates” menu. From there, you can update your WordPress core, themes, and plugins. Before updating, it’s a good idea to backup your website to ensure that you can restore it in case of any issues.

It’s also essential to make sure that your plugins and themes are compatible with the latest version of WordPress. Incompatible plugins or themes can cause website crashes or even create security vulnerabilities, so be sure to check compatibility before updating.

Strengthen Login Credentials

One of the first things to do to protect your WordPress site from hacking attempts is to ensure that you have strong login credentials. Here are some best practices to follow:

Choose strong passwords. A strong password should be at least 12 characters long and include a mix of upper and lowercase letters, numbers, and symbols. Avoid using easily guessable information, such as your name or birthdate, and don’t reuse passwords across different accounts.

Use two-factor authentication (2FA). 2FA provides an additional layer of security to your login credentials by requiring a second form of authentication beyond your username and password. This can be in the form of a unique code sent to your phone or a biometric scan.

WordPress has several plugins that enable 2FA. Two popular options are Google Authenticator and Authy. You can also use security plugins such as Wordfence or iThemes Security, which offer a range of security features including 2FA. Once you have enabled 2FA, you will be prompted to enter the additional code every time you log in.

Protect your login page with a captcha. A captcha is a security feature that requires the user to prove they are a human and not an automated script. This can help prevent brute force attacks and other automated login attempts. Some of the most trusted captcha services are reCAPTCHA by Google and Turnstile by Cloudflare. There are several WordPress plugins available that can help you add a captcha to your login page automatically. This is a great extra layer of security for your website to help keep it safe from malicious attacks.

Limit Login Attempts

One of the most common ways hackers attempt to gain access to a WordPress site is through brute force attacks, in which they try a multitude of username and password combinations until they get in. To protect your site against this type of attack, it’s important to limit login attempts.

Limiting login attempts means that after a certain number of failed attempts to log in to the site, the user is locked out. This makes it much more difficult for hackers to gain access.

There are a few ways to limit login attempts. One is to use a plugin that is specifically designed to limit login attempts. Another is to edit your site’s .htaccess file to block certain IP addresses after a certain number of failed login attempts.

Using a plugin is usually the easiest option, and there are several available in the WordPress plugin repository. Some popular options include Login Lockdown, WP Limit Login Attempts, and Limit Login Attempts Reloaded. These plugins allow you to set the number of failed login attempts that will trigger a lockout, as well as the duration of the lockout.

By limiting login attempts, you can greatly reduce the risk of your site being hacked through brute force attacks.

Use Security Plugins

One of the easiest ways to secure your WordPress website is to use security plugins. There are many security plugins available that can help protect your site from common attacks. Some of the popular security plugins include Wordfence, iThemes Security, and Sucuri.

Security plugins typically offer features like malware scanning, brute-force attack prevention, and login protection. They can also monitor your website for suspicious activity and send you alerts if anything seems amiss.

When choosing a security plugin, it’s important to consider factors like the level of protection it offers, ease of use, and cost. Some plugins offer basic protection for free, while others may require a subscription or one-time fee for more advanced features.

It’s also important to regularly update your security plugin to ensure that it is providing optimal protection against new and emerging threats.

Use HTTPS and SSL Certificates

HTTPS Security

HTTPS (HyperText Transfer Protocol Secure) and SSL (Secure Sockets Layer) certificates are security protocols that encrypt communication between a web server and a user’s browser. Using HTTPS and SSL helps to protect sensitive information that may be transmitted between a user and a website, such as login credentials or payment information.

Encrypting your website not only adds an extra layer of security, but it also enhances the credibility of your website in the eyes of your visitors. Most web hosting providers offer free SSL certificates or easy integration with third-party SSL providers.

To implement HTTPS and SSL on your website, you can start by acquiring an SSL certificate and installing it on your web server. Some web hosting providers offer a one-click SSL installation process, while others require manual installation. Once installed, you can configure your WordPress site to use HTTPS by updating the site URL in the WordPress settings or by using a plugin to force HTTPS.

Backup Your Website

Backups are critical to protecting your WordPress website from data loss in the event of a hack or another issue. There are many ways to backup your website, including using plugins or backing up manually. Here are some key points to keep in mind:

  • Why it’s important to backup your website: A backup is like an insurance policy for your website. If your website is hacked or otherwise damaged, a backup ensures that you can restore your website to its previous state quickly and easily.
  • How to backup your website: You can backup your website manually by exporting your website’s files and database or by using a plugin that automates the process. Many hosting providers also offer backup services.
  • Tips for ensuring successful backups: Make sure to backup your website regularly, preferably daily or weekly. Test your backups to ensure that they are working correctly and that you can successfully restore your website from them. Keep your backups in a secure location, such as a cloud storage service or an external hard drive, separate from your website’s server.

With a backup plan in place, you can rest easy knowing that you can quickly restore your site should something go wrong.

Monitor Your Website for Suspicious Activity

Keeping an eye on your website for suspicious activity is essential to prevent or recover from a possible security breach. Some common signs of suspicious activity include unfamiliar user accounts, failed login attempts, changes in file size or permissions, and malware warnings from search engines.

To monitor your website for suspicious activity, you can use various tools such as security plugins or monitoring services. For instance, plugins like Sucuri or Wordfence can scan your website for vulnerabilities and send you alerts for potential threats. Additionally, Google Search Console can notify you if your website is hacked or infected with malware.

It’s also prudent to set up notifications for any suspicious activity. You can do this by configuring your website’s security plugin or using a monitoring service that provides alerts via email, text message, or push notification.

Remember to check your website regularly and address any suspicious activity immediately. Ignoring it could lead to significant damage to your website’s security and reputation.

Don’t Wait Until It’s Too Late

Protecting your WordPress website from hackers should be a top priority. By following the tips outlined in this article, you can significantly reduce the risk of a security breach. By implementing these security measures, you can help ensure the safety and security of your website and its users. Additionally, there are many resources available for learning more about website security, such as online tutorials, forums, and security experts. Don’t wait until it’s too late; take action now to protect your WordPress website from potential security threats.

Mastering The WordPress Block Editor

WordPress is one of the most popular content management systems (CMS) on the internet. It powers over 40% of websites globally, and the introduction of the WordPress Block Editor in version 5.0 has made website creation and design even easier. The Block Editor, also known as Gutenberg, allows users to create content using modules that can be easily customized and arranged to create unique page layouts. In this guide, we will explore the Block Editor and its features, and provide tips on how to use it effectively to create visually appealing and functional websites.

Block Editor VS Classic Editor

The block editor provides a number of benefits over the classic editor. First and foremost, it makes creating and designing content much easier and more intuitive. With the block editor, users have greater control over the layout of their content, with the ability to add, move, and resize blocks as needed. Additionally, the block editor provides a wide range of pre-built blocks and templates that can be used to quickly create professional-looking pages and posts.

The block editor also offers better support for multimedia content, with built-in options for adding images, videos, and audio files. Finally, the block editor is designed to be more mobile-friendly, with responsive design options that ensure your content looks great on any device.

If you’re been putting off switching to the new editor experience, now is a great time to give it another try. The block editor has greatly improved over the last few years, adding excellent new features and refining the interface and controls.

Overview of the Block Editor Interface

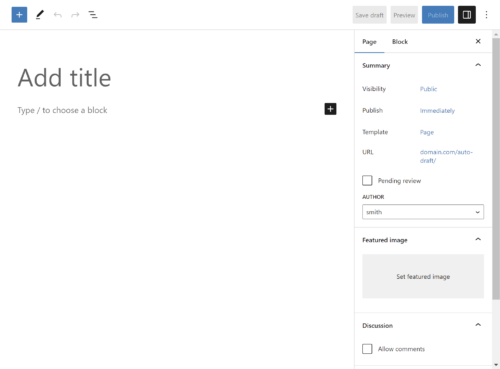
WordPress Block Editor Screen

The WordPress Block Editor interface provides a modern and user-friendly editing experience. The Block Editor is built around the idea of blocks, which are individual units of content such as paragraphs, headings, images, videos, and more. Blocks can be easily manipulated, moved around, and customized to create beautiful and engaging web pages or blog posts.

The Block Editor is divided into two main areas: the content area and the sidebar. The content area is where you can create and edit your blocks, while the sidebar provides additional options and settings for each block. The sidebar is context-sensitive, which means that it changes depending on the block you have selected. This allows you to easily customize each block without having to search through a lot of options.

How to Create Content with Blocks

The block editor allows you to create content in a modular way using various blocks. Here are the steps to create content with blocks:

  1. Click on the “Add Block” button (+ icon) in the top left corner of the editor or use the forward slash command “/” to search for a block type.
  2. Select the type of block you want to use. There are various types of blocks available such as paragraphs, headings, images, videos, and more.
  3. Customize the block settings as per your requirements using the options available in the block toolbar. For example, you can change the font size, text color, add a link, etc.
  4. To move a block up or down, click on the block and use the up and down arrow icons that appear at the top of the block.
  5. To delete a block, click on the three dots icon in the top right corner of the block and select “Remove Block”.
Block Toolbar
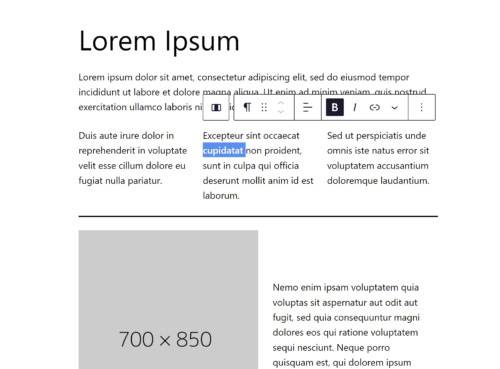
Block Toolbar

Most people find the block editor to be intuitive and easy to use, even for those who are not familiar with WordPress. In the WordPress block editor, each block comes with its own set of formatting options and settings that allow you to customize the appearance and behavior of the block. These options can usually be found in the right-hand sidebar when the block is selected.

For example, a paragraph block allows you to change the font size and style, text alignment, and background color. You can also add hyperlinks, drop caps, and inline code snippets.

Similarly, an image block lets you choose the image file, adjust its size and alignment, add a caption, and link the image to a URL. You can also add alternative text and choose how the image behaves on different screen sizes.

Other blocks, such as the heading block or the list block, have their own unique formatting options as well. Overall, the block editor offers a wide range of settings and options for creating rich, dynamic content with ease.

Advanced Block Editing Techniques

Once you become comfortable with the basics of the block editor, you can start exploring some advanced techniques that can help you create more complex and dynamic layouts.

  • Customizing block styles: The block editor allows you to customize the style of each block. You can change the font size, color, background, and more. You can also create your own custom styles that can be reused across different blocks.
  • Creating custom blocks: If you have some coding knowledge, you can create your own custom blocks. This allows you to create blocks that are tailored to your specific needs and can include advanced features and functionality.
  • Adding custom CSS: The block editor also allows you to add custom classes or CSS to individual blocks or the entire page. This can be useful if you want to apply some custom styling that is not available through the block editor’s interface.
  • Using third-party plugins: There are many third-party plugins available that extend the functionality of the block editor. These plugins can add new blocks, customize existing blocks, and provide additional features and functionality.

Mastering these advanced techniques can help you create more complex and dynamic layouts with the block editor and unlock its full potential.

Reusable Blocks

Another advanced feature available in the WordPress block editor is the ability to create reusable blocks. Reusable blocks are pre-made block designs that you can save and reuse throughout your website, which can save you time and streamline your content creation process.

To create a reusable block, first, create the block you want to reuse. Once you have the block set up the way you want it, select it and click on the three dots options icon in the block toolbar. From there, click “Create Reusable block”. You’ll be prompted to give the block a name, and once you do, it will be saved as a reusable block.

To use a reusable block, simply go to the block inserter and select the “Reusable” tab. You’ll see all of your saved reusable blocks, and you can insert them just like any other block. If you need to make changes to a reusable block, simply edit the block, and the changes will be applied to all instances of the block on your website.

Using reusable blocks can save you a lot of time and effort, especially if you have a lot of similar content to create. It also helps ensure consistency throughout your website, as you can reuse the same design elements in multiple places.

Groups

Using groups in the WordPress block editor can be a powerful tool for organizing and managing your content. With groups, you can link together multiple blocks and then easily move, copy, or delete them as a unit. This can be especially helpful when working with complex layouts or when you need to make changes to multiple blocks at once.

To create a group, select the blocks you want to group together, then click the “Group” option in the block toolbar or use the keyboard shortcut (Ctrl + G on Windows, Cmd + G on Mac). You can then customize the group’s settings by clicking on the group block and adjusting the options in the sidebar.

Using groups can also help to keep your content more organized and easier to manage. For example, you can use groups to separate different sections of a page or to group together related content. This can be particularly helpful for larger websites or blogs with a lot of content. Grouping your content together can make it easier for visitors to navigate your site and find the information they’re looking for.

Tips for Using the Block Editor Effectively

Cover Block
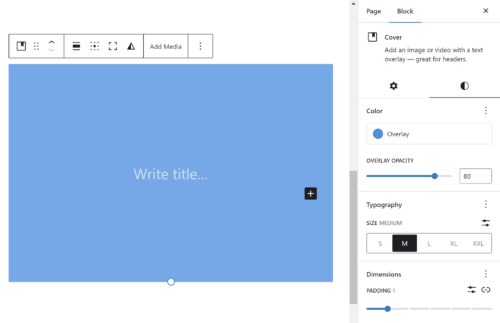
Cover Block

While the Block Editor is a powerful tool for creating engaging and dynamic content, it can also be overwhelming at first. Here are some tips to help you use the Block Editor more effectively:

  • Use keyboard shortcuts: Keyboard shortcuts can save a lot of time and speed up your workflow. Some popular shortcuts include Ctrl + C to copy, Ctrl + V to paste, and Ctrl + Z to undo.
  • Take advantage of block patterns: Block patterns are pre-designed layouts that you can use to quickly create engaging content. WordPress includes several block patterns by default, and you can also create your own.
  • Customize your toolbar: The Block Editor toolbar can be customized to include only the tools you use most often. This can help reduce clutter and make it easier to find the tools you need.
  • Use the document outline: The document outline in the Block Editor sidebar can help you keep track of your content’s structure and hierarchy. Use headings and subheadings to organize your content and make it more accessible.
  • Preview your content: The Block Editor includes a preview mode that lets you see how your content will look on the front end of your website. Use this feature to make sure your content looks great and functions properly.
  • Eliminate distractions: Improve your focus by enabling distraction free mode and making the editor fullscreen.

Following these tips can help you use the Block Editor to create beautiful, engaging content more efficiently.

Best Practices for Using the Block Editor

While the block editor can be a powerful tool for creating content, there are some best practices you should keep in mind to make the most of it. Here are some tips for using the block editor effectively:

  1. Organize your content: Use headings, subheadings, and bullet points to make your content easy to read and understand. Add a Table of Contents to help readers navigate through longer articles.
  2. Optimize for SEO: Use the Yoast SEO plugin to optimize your content for search engines. Use keywords in your headings, meta descriptions, and rich content to improve your search rankings.
  3. Avoid common mistakes: Be mindful of using too many blocks, which can slow down your website. Also, avoid using too many font styles and sizes, which can make your content look cluttered and unprofessional.
  4. Keep it simple: Use the block editor to simplify your content creation process. Don’t get bogged down with too many settings and formatting options. Stick to the basics and keep your content easy to read and understand.

By following these best practices, you can make the most of the block editor and create high-quality content that engages your readers and improves your search rankings.

Troubleshooting Issues With The Block Editor

While the block editor is generally user-friendly, there are some common issues that may arise while using it. For example, you may experience difficulty moving blocks or encounter unexpected formatting issues.

One way to troubleshoot these issues is to disable any third-party plugins that may be interfering with the editor. It’s also a good idea to ensure that your WordPress installation and all plugins are up-to-date, as older versions can sometimes cause compatibility issues. Additionally, you can try switching to a different browser or clearing your browser cache to see if that resolves the issue. If you’re still having trouble, you can consult the WordPress support forums or contact your web host for further assistance.

Start Using It!

The WordPress block editor is a powerful tool for creating engaging and visually appealing content. With its intuitive interface, advanced editing features, and reusable block functionality, it offers a more streamlined and efficient way to create content than the classic editor. By taking advantage of the many formatting and customization options available for each block, you can create content that stands out and resonates with your audience.

To use the block editor effectively, it’s important to follow best practices for organizing your content, optimizing for SEO, and avoiding common mistakes. And if you encounter any issues while using the block editor, there are many resources available online for troubleshooting and getting help.

Overall, the block editor is an essential tool for any WordPress user looking to create engaging and professional-looking content. With some practice and experimentation, you can master the block editor and take your content creation to the next level.

Create an Online Ecommerce Store With WordPress and WooCommerce

Creating an online ecommerce store can seem daunting, but with WordPress and WooCommerce, it’s easier than ever to get started. WooCommerce is a plugin that can be added to any WordPress site to turn it into a full-fledged ecommerce shop. It’s free to use and comes with a variety of features and customization options to help you create a unique and successful online store.

WordPress is one of the most popular content management systems (CMS) in the world, and WooCommerce is the leading ecommerce plugin for WordPress. Together, they make it easy to create a professional-looking and user-friendly ecommerce store without any coding experience.

Setting Up Your Store

If you don’t already have a WordPress site started, the first step will be to choose a web hosting provider and install WordPress. You can choose a pre-made WordPress theme from the directory, or hire a professional to design and build a custom theme just for you. Once you have your WordPress site up and running, you can install the WooCommerce plugin directly from the WordPress plugin repository. After installation, the setup wizard will guide you through the setup process, including setting up payment and shipping options.

To sell products on your ecommerce store, you’ll need to set up one or more payment gateways. Payment gateways are the services that securely process and authorize credit card payments on your website. WooCommerce supports a wide range of payment gateways, including popular ones like PayPal, Stripe, Square, and Authorize.net. It is important to consider the fees charged by each service, its ease of use, and the level of security provided. You should also ensure that the gateway you choose is compatible with your store’s location and the currencies you plan to accept.

You’ll also need to configure shipping options for your ecommerce store. WooCommerce supports a variety of shipping options, including free shipping, flat rate shipping, and real-time shipping rates based on weight and destination.

In addition to the core WooCommerce plugin, there are many other extensions and add-ons available to further customize your online store. These include integrations with popular payment gateways, inventory management systems, shipping providers, and much more.

Listing Your Products

Now it’s time to add your products to your store. You can do this manually, or you can import products in bulk using a CSV file. Each product should have a title, description, price, and any other relevant information such as variations, product images or videos, and shipping information. WooCommerce makes it easy to add products and categories, set prices, and manage inventory.

With WooCommerce, you can easily set up variations for your products, such as different colors, sizes, or styles. This allows your customers to choose the exact product that fits their needs, increasing the chances of a successful sale. You can also set different prices for each variation, which is useful if some variations are more expensive to produce or require different materials. Additionally, you can set stock levels for each variation, ensuring that you don’t oversell products that you don’t have in stock. Using product variations gives you a lot of flexibility in how you sell your products online.

Product images are an essential aspect of any online store as they help to showcase the products in the best possible way to potential customers. It is crucial to ensure that your product images are of high quality and accurately reflect the product being sold. This means investing in high-quality photography or hiring a professional photographer to take product photos. It is also important to ensure that product images are optimized for the web, as large images can slow down the site’s loading speed. Additionally, having multiple images of each product from different angles can help customers make informed decisions about their purchase. Finally, ensuring that product images are consistent in terms of size, shape, and style can help give the store a cohesive look and feel.

Marketing Your Store

Once your products are added, you can begin marketing your online shop. This may include setting up social media accounts, running targeted ads, and creating email marketing campaigns. It’s important to constantly analyze your store’s performance and make adjustments as needed. WooCommerce provides detailed analytics to help you track sales, traffic, and customer behavior.

Coupon codes are a popular marketing tool used by online retailers to drive sales and reward customer loyalty. With WooCommerce, you can easily create and manage coupon codes for your online store. Codes can be set up to offer a fixed discount, a percentage discount, free shipping, or other benefits. You can also specify the minimum order amount, the number of uses per coupon, and the expiration date. By using coupon codes strategically, you can encourage customers to make a purchase, increase customer loyalty, and drive more sales for your online store.

To ensure your ecommerce store is visible to potential customers, it’s important to optimize it for search engines. This includes adding relevant keywords to your product descriptions, optimizing your website’s structure and layout, and building backlinks to your website.

With WordPress and WooCommerce, creating an online ecommerce store has never been easier. With a bit of effort and dedication, you can attract and retain customers and turn your passion for selling into a successful online business.

Website Maintenance: Keeping Your WordPress Site Healthy

WordPress is by far the most popular content management systems (CMS) in the world, with millions of websites using it to power their online presence. However, building a WordPress website is only the beginning of your journey. Maintaining your website is just as important as building it, as it helps ensure that your website stays secure, up-to-date, and optimized for the best possible user experience. In this article, we’ll explore the essential ongoing maintenance tasks you need to perform on your WordPress website to keep it running smoothly.

Keep WordPress Updated

WordPress regularly releases updates to fix security issues, bugs, and improve functionality. Keeping your WordPress site updated is an essential part of website maintenance, as it helps to ensure that your site remains secure, stable, and performs optimally.

You can update your WordPress site manually or automatically. To update WordPress manually, you need to log in to your WordPress dashboard and navigate to the updates section. Alternatively, you can download the WordPress core files from wordpress.org and upload them to your server manually.

To enable automatic updates, head to the updates page in the WordPress dashboard and choose to enable automatic updates for maintenance and security releases only, or for all new versions of WordPress. This will ensure that your site is always up to date without having to do it manually.

Update Plugins and Themes

Like the WordPress core, updating plugins and themes is also critical for maintaining the security and functionality of a WordPress website. Outdated plugins and themes can potentially introduce security vulnerabilities or compatibility issues with new versions of WordPress.

It is important to regularly check for updates and install them as soon as they become available. Most plugins and WordPress themes will display a notification in the WordPress dashboard when updates are available, and users can also check for updates manually.

Before updating plugins and themes, it is recommended to create a backup of the website to avoid potential data loss or other issues. In addition, it’s important to read the update release notes and check for any compatibility issues or known bugs that may affect the website.

If a plugin or theme is no longer being maintained or updated by the developer, it’s recommended to find an alternative solution or consider removing it from the website to avoid potential security risks.

Backup Your Website

Backing up a WordPress website is an important part of ongoing maintenance. Regular backups can help you restore your website to a previous state if anything goes wrong, such as a hacking attack or accidental deletion of important files.

There are several backup options available for WordPress, including manual backups and automated backup plugins. Manual backups involve downloading a copy of your website files and database to your local computer or cloud storage. This method is more time-consuming and may require technical knowledge, but it gives you complete control over the backup process.

Automated backup plugins, on the other hand, offer a more convenient option for backing up your website. There are several popular backup plugins available for WordPress, including UpdraftPlus, Jetpack Backup, and BackupBuddy. These plugins can schedule regular backups of your website files and database, and store the backups in a secure offsite location such as Dropbox, Google Drive, or Amazon S3.

No matter which backup option you choose, it’s important to test your backups periodically to make sure they are working properly. This can involve restoring your website from a backup and checking that everything is functioning as expected. By taking the time to back up your website regularly, you can ensure that your data is safe and secure, and that your website can be quickly restored in the event of an emergency.

Monitor Website Performance

Website speed is critical to test on a regular basis. Over time, your WordPress website may become slow and sluggish. This can be caused by a number of factors, such as outdated plugins, inefficient code, and too many images. Slow page load times and other performance issues can lead to a poor user experience and lower search engine rankings. There is a plethora of things that affect page speed, so it’s important to optimize your website on a regular basis to keep it running smoothly.

You can use free tools like Google PageSpeed Insights or GTmetrix to analyze your website’s speed and identify any areas for improvement. These utilities can help identify any bottlenecks in website performance, such as slow-loading images or inefficient code. They can also provide reports on page load times, file sizes, and other metrics that can help you optimize your website for better performance. If your website is slow, you can optimize images, use a caching plugin, or upgrade your hosting plan.

Secure Your Website

Securing your WordPress website is essential to protect it from hackers, malware, and other security threats. You can use plugins like Wordfence or Sucuri to monitor your website for suspicious activity, implement two-factor authentication, and add a firewall to your website.

WordPress websites are a common target for malware attacks. Malware is a type of malicious software that can infect your website and steal your visitors’ data. It is important to scan your website for malware regularly using a reputable security plugin. There are a number of free and paid malware scanning tools available.

Keep it Clean

Keeping your WordPress installation clean is an important part of ongoing maintenance. Over time, websites can accumulate and become cluttered with unnecessary data such as spam comments, post revisions, and unused media files, which can slow down the site’s performance and make it harder to manage. It is recommended to regularly clean up your website’s database, remove any unused plugins and themes, and delete any unnecessary files or data. There are even plugins available to help with cleaning up and optimizing your database and removing unnecessary files.

Additionally, optimizing images, using caching plugins, and minimizing the use of external scripts can help improve the speed and performance of your WordPress website. It’s also important to regularly test your website’s functionality and user experience to ensure that everything is working as intended.

Test and Fix

Checking your site for broken pages and incompatibilities with plugins is an important part of regular maintenance for any website. Broken links and display bugs can lead to a poor user experience, and incompatibilities with plugins can cause errors or even crashes on your site.

Every time your site receives a WordPress update or a plugin update, you should give your site a good once-over to make sure everything is still kosher, as often these updates can introduce new issues. If you notice any errors or problems after updating a plugin, you may need to troubleshoot or even uninstall the plugin to prevent further issues. It’s also important to only use well-reviewed and reliable plugins to minimize the risk of incompatibilities or other issues.

To check your site for broken links, you can use a plugin like Broken Link Checker or WP Broken Link Status Checker. These plugins will scan your site and alert you to any broken links so that you can quickly fix them.

In addition to these important maintenance tasks, here are a few other things to keep in mind:

  • Monitor your website traffic. It is important to monitor your website traffic so that you can see how people are interacting with your website. This information can be used to improve your website’s design, content, and functionality.
  • Keep your content fresh. One of the best ways to keep visitors coming back to your website is to keep your content fresh. This means regularly adding new blog posts, products, or services to your website. Don’t be afraid to shuffle things around, reword some of your copy, and add new images to keep it interesting.
  • Monitor your SEO performance. You can use tools like Google Search Console to track how well your site is ranking, which pages are performing well, and to see which are your most successful keywords. It can also help identify many other SEO and UX issues.
  • Moderate your comments. If your site has comments enabled, you will need to take time to approve the good comments, delete the toxic comments, and report the spam comments.

Maintaining a WordPress website is an ongoing process that requires time and effort. Think of a website as a living and breathing organism that requires constant TLC to keep it healthy. By following these essential maintenance tasks, you can ensure that your website stays secure, optimized, and up-to-date. Remember to back up, clean up, and test your website regularly to ensure the best possible user experience for your visitors.

WordPress: The Platform that Powers the Web

WordPress is the world’s most popular content management system (CMS) used for building websites. Over 40% of all websites are powered by this flexible and versatile platform. It’s a free and open-source software, which means that it is free to use and modify, and it enables users to create and manage websites without needing to know how to code.

At its core, WordPress is an SEO-friendly publishing platform built on PHP that allows users to create and publish content, including pages, articles, blog posts, and much more. It offers a user-friendly and familiar interface that makes it easy for anyone to manage their website. WordPress can be used to create a wide variety of websites, including blogs, business sites, and online stores.

WordPress works by combining a collection of core files, a MySQL database, and additional files that you upload or install. The core files are the foundation of WordPress and provide the basic functionality of the system. The database is where all of your content and settings are stored. The files that you add or install augment WordPress with new features and functionality, as well as customize the appearance of the front end of your website.

To use WordPress, you will need to purchase web hosting and a domain name. Web hosting is where your website files will be stored, and your domain name is the address of your website on the internet. Once you have purchased web hosting and a domain name, you can install WordPress on your hosting account. This will require uploading the core WordPress files over FTP and creating a MySQL database. Of if you prefer the easy button method, some web hosts have a handy one click install feature.

Once you have WP installed on your server, you can start customizing the look and feel of your website by choosing a theme. WordPress themes are pre-made designs that you can install and activate on your website. There are thousands of free and premium themes available, so there’s a good chance you can find one that suits most of your needs. Or if you’re ambitious, you can design and build one yourself.

In addition to themes, you can also add new features and functionality to your website by installing plugins. Plugins are small pieces of software that can be installed to extend the capabilities of WordPress. One of the key benefits of WordPress is its vast library of plugins, which allows users to add complex functionality to their website without needing to hire a developer. Users can install plugins to add nearly any feature you can think of, such as e-commerce functionality, social media sharing buttons, or search engine optimization tools.

In addition, WordPress is highly customizable, meaning developers can write custom code to add even more advanced features or modify existing ones. It’s also secure and regularly updated with security patches. This helps to protect your website from hackers and malware, and makes it a safe and reliable option for users who want to protect their online data.

The WordPress admin dashboard is easy to use and navigate. You can use it to add pages, posts, media, and other content to your website. You can also use the dashboard to manage your website’s settings, security, and performance.

Overall, WordPress is a powerful and versatile CMS that makes it easy for anyone to create and manage a website. Its flexibility, ease of use, and wide range of customization options have made it a popular choice for businesses, bloggers, and individuals alike.