

Are you looking to take your website development skills to the next level and build your own WordPress theme? If you’ve already created an HTML prototype page, you’re halfway there! In this guide, we will walk you through the process of converting your static HTML prototype into a fully functional and customizable WordPress theme. By harnessing the flexibility and extensibility of WordPress, you’ll be able to create stunning and dynamic websites with ease. Whether you’re a seasoned developer or just starting out, this article will provide you with the knowledge and tools to craft your very own WordPress theme. Get ready to embark on an exciting journey where your HTML prototype evolves into a powerful and engaging website powered by WordPress.
Understanding the Structure of a WordPress Theme
To successfully transform your HTML prototype into a WordPress theme, it’s essential to grasp the structure and components of a WordPress theme to be able to organize your code effectively and leverage the full potential of WordPress.
Basic Components of a WordPress Theme:
At its core, a WordPress theme is build with PHP and consists of various files and directories that define the layout, design, and functionality of your website. The key components include:
style.css: This file holds the essential information about your theme, such as its name, author, version, as well as visual styling.index.php: Serving as the main template file, it controls the overall structure of your theme.header.phpandfooter.php: These files contain the header and footer sections of your theme, providing consistency across multiple pages.functions.php: This file allows you to add custom functions and modify the default behavior of your theme.
File Structure and Hierarchy:
WordPress follows a hierarchical structure for loading template files. Understanding this hierarchy is crucial to ensure that the correct templates are used for different types of content. The primary template file, index.php, serves as the fallback when more specific templates are not available, such as page.php, which would be used to display individual pages instead of the index.php file. Some other commonly used template files include:
single.php: Used for displaying individual posts.archive.php: Used for displaying date-based archive pages.category.php: Used for displaying category archive pages.tag.php: Used for displaying tag archive pages.search.php: Used for displaying search results.404.php: Used for displaying the “Page Not Found” error page.
Take some time to study the default themes included with WordPress to see how a theme can be structured and organized. By comprehending the structure and hierarchy of a WordPress theme, you’ll be able to organize your files efficiently and leverage the flexibility offered by the platform. Now it’s time to dive deeper into the process of converting your HTML prototype into a WordPress theme, taking advantage of this structure and hierarchy.
Analyzing and Preparing the HTML Prototype
Part of the process of creating a WordPress theme is analyzing your existing HTML prototype to ensure its compatibility with the WordPress structure. This step will save you time and effort in the long run. Here are a few key considerations:
- Review your HTML prototype and identify any WordPress-incompatible elements or features. For example, check if the prototype relies on static file paths or includes hardcoded content that should be dynamic in a WordPress theme. Assessing these factors early on will help you plan the necessary adjustments and modifications.
- Look for components or sections within your HTML prototype that can be reused across multiple pages or posts. These could include headers, footers, navigation menus, sidebars, and more. Identifying these reusable elements will allow you to create separate template files, making your theme more modular and easier to manage.
- Take note of any design patterns or recurring elements in your HTML prototype. These could include typography styles, color schemes, button designs, or other visual elements. By documenting these common elements, you can create consistent stylesheets and reusable CSS classes, ensuring a cohesive look and feel throughout your WordPress theme.
Analyzing and preparing your HTML prototype for WordPress compatibility sets the stage for a smoother transition into theme development.
Enqueuing Stylesheets and Scripts
To ensure proper loading and management of stylesheets and scripts in your WordPress theme, it’s a best practice to enqueue them using WordPress functions. Enqueuing allows you to add external stylesheets, custom styles, and JavaScript files in a way that is compatible with WordPress and avoids conflicts with other themes or plugins. Let’s explore the process:
Enqueuing Stylesheets:
If your HTML prototype includes custom CSS styles, you can create a new stylesheet specifically for your WordPress theme. Name it style.css and place it in the root directory of your theme.
Open the functions.php file of your theme and locate the appropriate section for enqueuing stylesheets. Utilize the wp_enqueue_style() function to enqueue your stylesheets. This function takes parameters such as a handle (a unique ID for your stylesheet), the path to the stylesheet file, and any dependencies if needed. For example:
   function enqueue_theme_stylesheets() {
       wp_enqueue_style( 'theme-style', get_stylesheet_uri() );
   }
   add_action( 'wp_enqueue_scripts', 'enqueue_theme_stylesheets' );
This enqueues a stylesheet using the get_stylesheet_uri() function, which automatically retrieves the path to the current theme’s default stylesheet.
Enqueuing Scripts:
If your HTML prototype includes JavaScript functionality, you can enqueue scripts as well.
Similar to enqueuing stylesheets, open the functions.php file and locate the appropriate section for enqueuing scripts. Use the wp_enqueue_script() function to enqueue your scripts. Enter parameters for the handle, the path to the script file, and any dependencies if necessary. For example:
   function enqueue_theme_scripts() {
       wp_enqueue_script( 'theme-script', get_template_directory_uri() . '/js/scripts.js', array( 'jquery' ), '1.0', true );
   }
   add_action( 'wp_enqueue_scripts', 'enqueue_theme_scripts' );
Now we’ve enqueued a script using the get_template_directory_uri() function to retrieve the path to the theme’s directory and concatenating it with “/js/custom.js”, which specifies the path to the custom JavaScript file. It also specifies “jquery” as a dependency, ensuring that the jQuery JavaScript library is loaded before the custom script. The 1.0 value represents the version number of the script, and the “true” parameter indicates that the script should be placed in the footer for optimal performance.
Properly enqueuing stylesheets and scripts in your WordPress theme ensures that they are loaded efficiently and in the correct order. This practice enhances the performance and compatibility of your theme with various browsers and devices.
Converting HTML Markup into Dynamic WordPress Code
One of the key advantages of WordPress is its ability to dynamically generate and display content. To convert your static HTML prototype into a fully functional WordPress theme, you’ll need to incorporate the WordPress loop and replace static elements with dynamic WordPress functions. Let’s explore the process:
- Understanding the WordPress Loop:
The WordPress loop is a fundamental concept that retrieves and displays posts or other content from your WordPress database. It iterates through each post, allowing you to customize the display of individual items. Using the loop, you can easily generate dynamic content for your theme. - Replacing Static Elements:
Identify the static HTML elements in your prototype that should display dynamic content, such as blog posts, comments, or custom post types. Replace these elements with appropriate WordPress functions that utilize the loop to fetch and display the content. - Displaying Post Content:
To display the content of a post, you can use the_content() function within the loop. This function retrieves the main content of the current post and outputs it onto the page. You can place this function within the appropriate location in your theme’s template files to display the post content dynamically. - Listing Posts:
If you want to display a list of posts, such as on a blog page or archive page, you can use the have_posts() and the_post() functions in combination with other template tags. The have_posts() function checks if there are any posts to display, while the_post() function sets up the current post for iteration within the loop. You can then use template tags like the_title() or the_excerpt() to output the relevant information for each post. - Customizing Output:
WordPress offers a wide range of template tags and functions to customize the output of dynamic content. For example, you can use functions like the_permalink() to generate the URL for a post, the_author() to display the post author’s name, or the_time() to show the publication date.
Here’s an example of a simple WordPress loop that you can use as a starting point:
<?php
if ( have_posts() ) { // If posts are found
    while ( have_posts() ) {
        the_post();
        ?>
        <!-- The template for generating each post -->
        <article <?php post_class(); ?>>
            <h2><a href="<?php the_permalink(); ?>"><?php the_title(); ?></a></h2>
            <div class="entry-content">
                <?php the_content(); ?>
            </div>
        </article>
        <?php
    }
} else { // If no posts are found
    echo 'No posts found.';
}
?>
In this example, we first check if there are any posts available using the have_posts() function. If there are posts, we enter the loop and use the the_post() function to set up the current post. Inside the loop, we can access various template tags to display dynamic content.
This example provides a basic foundation for understanding and implementing the WordPress loop. Feel free to customize it further based on your specific requirements and desired design.
Integrating Custom Fields and Theme Options
On top of the core functionality of WordPress, you can further enhance the flexibility and customization of your theme by integrating custom fields and theme options. These powerful features allow you to add editable content sections and provide additional control over various aspects of your theme. Two key methods for achieving this are the WordPress Customizer and custom fields.
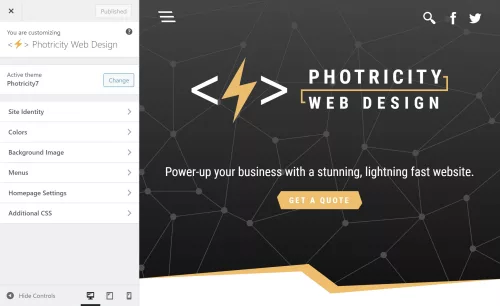
Using the WordPress Customizer for Theme Options
The WordPress Customizer provides a user-friendly interface for managing theme options. It allows users to customize various aspects of the theme, such as site title, logo, colors, and more. By leveraging the Customizer, you can provide users with the ability to personalize their website without touching any code.
To add theme options via the Customizer, you need to register a new section and add controls for each option. The registered options can then be accessed and applied to your theme’s templates. For example, you can create options for selecting a font style, choosing a layout, or even adding custom text.
Implementing Custom Fields for Editable Content
Custom fields offer a powerful way to add editable content sections to your theme. With custom fields, you can define specific areas within your theme where users can input dynamic content, such as a featured image, a banner text, or a call-to-action button. These fields provide a seamless way to update and manage content without modifying the theme’s core files.
To easily implement custom fields, you can use WordPress plugins like Advanced Custom Fields or Custom Field Suite. These plugins provide an intuitive interface for creating and managing custom fields. Once defined, you can retrieve the values of these fields within your theme’s templates and display them dynamically. This level of customization goes a long way in creating a unique and tailored experience for your website visitors.
Implementing Navigation Menus and Widgets
To provide seamless navigation and enhance the user experience, it’s essential to implement navigation menus and widget areas in your WordPress theme. Navigation menus allow users to navigate through different sections of your website, while widget areas provide dynamic content placement options. Let’s explore how to incorporate these elements into your theme.
Adding Custom Navigation Menus
WordPress provides a built-in functionality for creating custom navigation menus. With custom menus, you can define specific menu locations and assign menu items to them. This gives you full control over the structure and arrangement of your theme’s navigation.
To add a custom navigation menu, you need to register a menu location in your theme’s code and assign it to a specific menu location within the WordPress dashboard. You can then style and customize the menu appearance using CSS to match your theme’s design.
Incorporating Widget Areas
Widget areas, or sidebars, are regions within your theme where users can add and arrange various widgets. Widgets are pre-built elements that can display different types of content, such as recent posts, categories, tags, search forms, social media icons, and more.
To incorporate widget areas into your theme, you’ll need to register one or more widget areas in your theme’s functions.php file. Once registered, users can add and customize widgets in these designated areas using the WordPress Widgets settings. Widget areas are often placed in sidebars, footers, or any other section of your theme where you want to provide dynamic content placement options.
Implementing navigation menus and widget areas gives users the ability to navigate your website easily and customize its content placement. This flexibility allows them to personalize their browsing experience and access relevant information efficiently.
Testing and Debugging the WordPress Theme
Throughout the development of your WordPress theme, it’s crucial to conduct thorough testing to ensure a seamless user experience across various devices, browsers, and operating systems. Additionally, identifying and resolving any potential issues or bugs will contribute to the overall stability and performance of your theme.
Cross-Device and Cross-Browser Testing
To reach a wide audience, your WordPress theme should be responsive and compatible with different devices, including desktops, laptops, tablets, and smartphones. Test your theme on various screen sizes and resolutions to ensure proper rendering and functionality. Pay attention to navigation menus, content layout, and media responsiveness.
Similarly, testing your theme on different browsers (such as Chrome, Firefox, Safari, and Edge) will help identify any browser-specific issues. Ensure that your theme appears consistent and functions correctly across these browsers, considering differences in rendering and CSS support.
Functionality Testing
Thoroughly test the functionality of your theme by interacting with all its features, including menus, navigation links, search functionality, forms, and any custom functionality or plugins integrated into the theme. Verify that everything works as expected and that user interactions produce the desired results.
Test different scenarios, such as submitting forms, navigating between pages, and accessing various content types (such as blog posts, archives, and custom post types). Validate that all dynamic elements, such as post excerpts, featured images, and custom fields, display correctly and reflect the intended content.
There are some helpful plugins available that can scan your theme to identify issues, and help you to follow coding best practices. “Theme Check” and “Theme Sniffer” are two that I’ve found enormously helpful.
Error Handling and Debugging
During testing, closely monitor for any error messages, warnings, or unexpected behavior. WordPress provides useful debugging tools that can assist in identifying and resolving issues. Enabling WP_DEBUG in your WordPress configuration file (wp-config.php) helps to display error messages and warnings, facilitating the debugging process.
Inspect the browser console for any JavaScript errors and review the PHP error logs to capture any server-side issues. Addressing these errors promptly will ensure a smooth user experience and prevent potential security vulnerabilities.
Launch
Congratulations! You have journeyed through the process of transforming an HTML prototype into a fully functional WordPress theme. Creating your own WordPress theme allows you to unleash your creativity, tailor your website’s appearance and functionality to your specific needs, and provide a unique experience for your visitors. By combining the flexibility of HTML with the power of WordPress, you have the ability to build dynamic, interactive, and personalized websites.
Remember, the key to a successful WordPress theme lies in continuous improvement and refinement. Regularly update and enhance your theme to meet the evolving needs of your website and its users. Stay informed about the latest trends and best practices in WordPress development, and leverage the vast resources and supportive community to expand your knowledge and skills.
Now it’s time to take your newly created WordPress theme and launch your website. Embrace the boundless opportunities that WordPress offers, express your creativity, and make your mark on the world.