Mastering The WordPress Block Editor

WordPress is one of the most popular content management systems (CMS) on the internet. It powers over 40% of websites globally, and the introduction of the WordPress Block Editor in version 5.0 has made website creation and design even easier. The Block Editor, also known as Gutenberg, allows users to create content using modules that can be easily customized and arranged to create unique page layouts. In this guide, we will explore the Block Editor and its features, and provide tips on how to use it effectively to create visually appealing and functional websites.

Block Editor VS Classic Editor

The block editor provides a number of benefits over the classic editor. First and foremost, it makes creating and designing content much easier and more intuitive. With the block editor, users have greater control over the layout of their content, with the ability to add, move, and resize blocks as needed. Additionally, the block editor provides a wide range of pre-built blocks and templates that can be used to quickly create professional-looking pages and posts.

The block editor also offers better support for multimedia content, with built-in options for adding images, videos, and audio files. Finally, the block editor is designed to be more mobile-friendly, with responsive design options that ensure your content looks great on any device.

If you’re been putting off switching to the new editor experience, now is a great time to give it another try. The block editor has greatly improved over the last few years, adding excellent new features and refining the interface and controls.

Overview of the Block Editor Interface
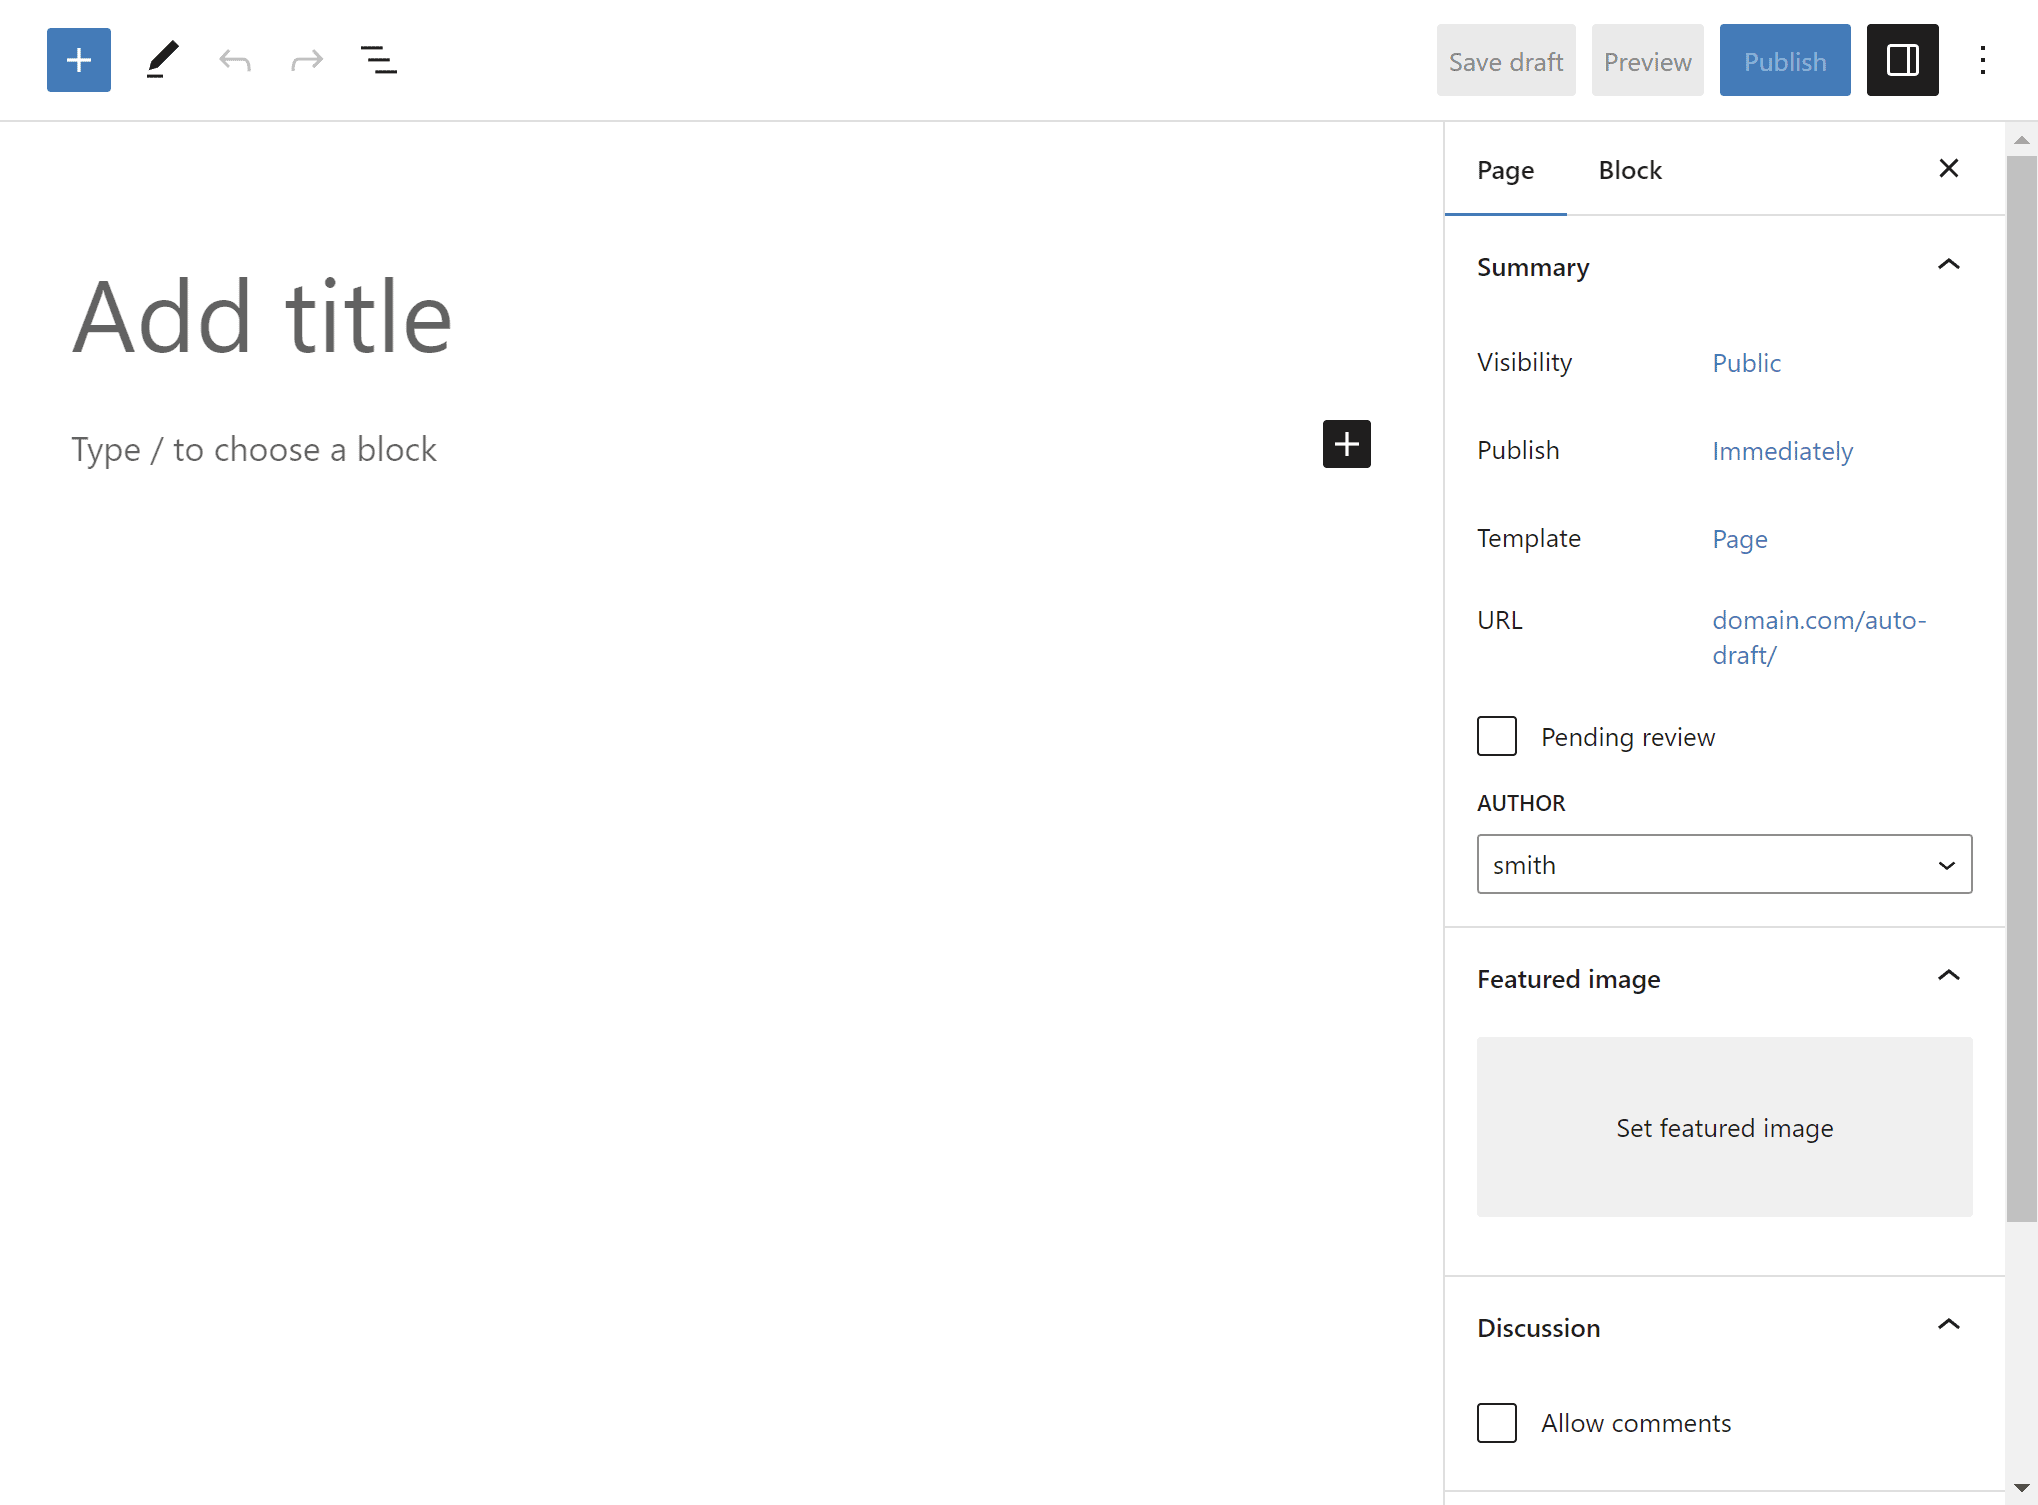
WordPress Block Editor Screen

The WordPress Block Editor interface provides a modern and user-friendly editing experience. The Block Editor is built around the idea of blocks, which are individual units of content such as paragraphs, headings, images, videos, and more. Blocks can be easily manipulated, moved around, and customized to create beautiful and engaging web pages or blog posts.

The Block Editor is divided into two main areas: the content area and the sidebar. The content area is where you can create and edit your blocks, while the sidebar provides additional options and settings for each block. The sidebar is context-sensitive, which means that it changes depending on the block you have selected. This allows you to easily customize each block without having to search through a lot of options.

How to Create Content with Blocks

The block editor allows you to create content in a modular way using various blocks. Here are the steps to create content with blocks:

  1. Click on the “Add Block” button (+ icon) in the top left corner of the editor or use the forward slash command “/” to search for a block type.
  2. Select the type of block you want to use. There are various types of blocks available such as paragraphs, headings, images, videos, and more.
  3. Customize the block settings as per your requirements using the options available in the block toolbar. For example, you can change the font size, text color, add a link, etc.
  4. To move a block up or down, click on the block and use the up and down arrow icons that appear at the top of the block.
  5. To delete a block, click on the three dots icon in the top right corner of the block and select “Remove Block”.
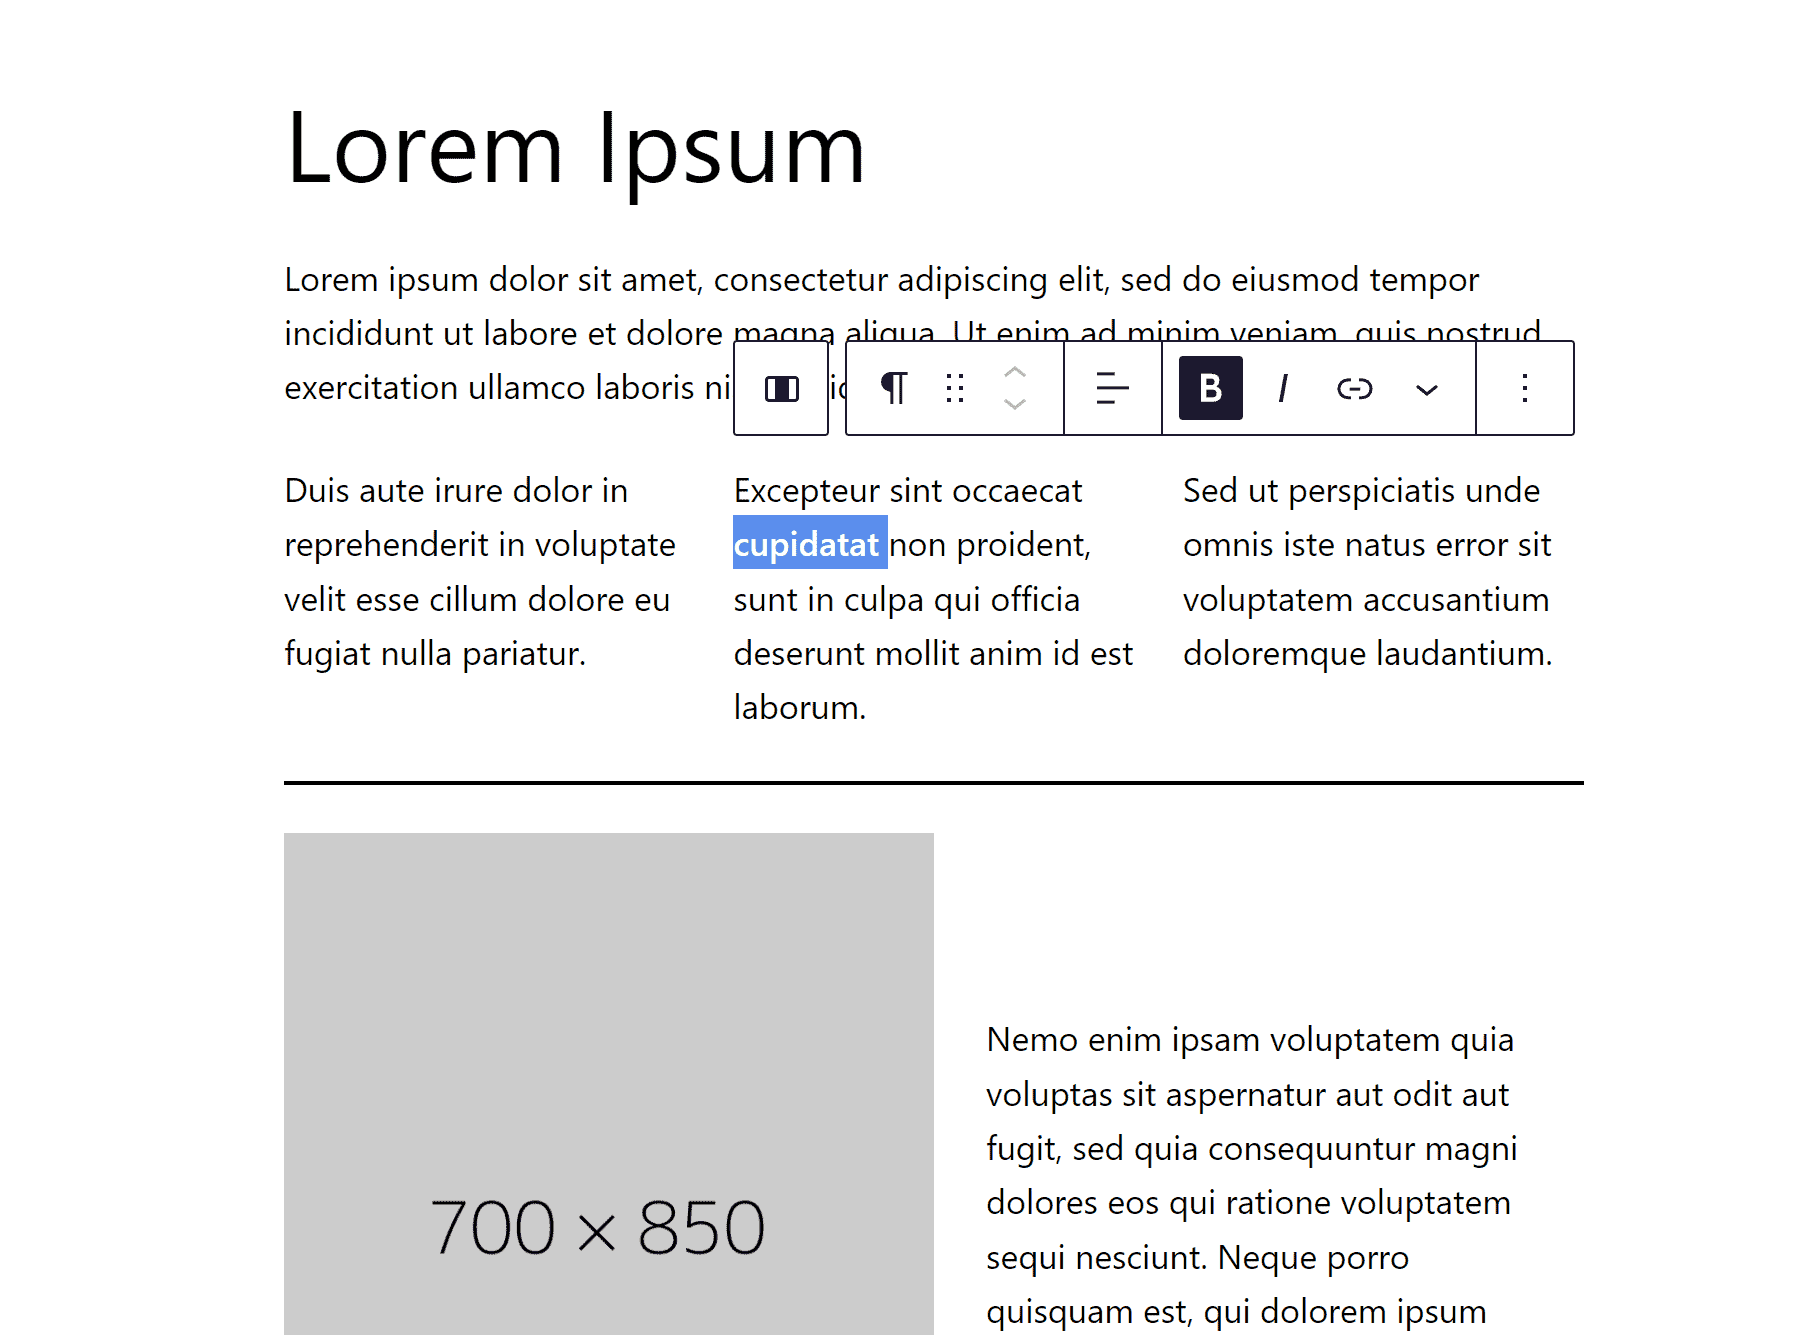
Block Toolbar
Block Toolbar

Most people find the block editor to be intuitive and easy to use, even for those who are not familiar with WordPress. In the WordPress block editor, each block comes with its own set of formatting options and settings that allow you to customize the appearance and behavior of the block. These options can usually be found in the right-hand sidebar when the block is selected.

For example, a paragraph block allows you to change the font size and style, text alignment, and background color. You can also add hyperlinks, drop caps, and inline code snippets.

Similarly, an image block lets you choose the image file, adjust its size and alignment, add a caption, and link the image to a URL. You can also add alternative text and choose how the image behaves on different screen sizes.

Other blocks, such as the heading block or the list block, have their own unique formatting options as well. Overall, the block editor offers a wide range of settings and options for creating rich, dynamic content with ease.

Advanced Block Editing Techniques

Once you become comfortable with the basics of the block editor, you can start exploring some advanced techniques that can help you create more complex and dynamic layouts.

  • Customizing block styles: The block editor allows you to customize the style of each block. You can change the font size, color, background, and more. You can also create your own custom styles that can be reused across different blocks.
  • Creating custom blocks: If you have some coding knowledge, you can create your own custom blocks. This allows you to create blocks that are tailored to your specific needs and can include advanced features and functionality.
  • Adding custom CSS: The block editor also allows you to add custom classes or CSS to individual blocks or the entire page. This can be useful if you want to apply some custom styling that is not available through the block editor’s interface.
  • Using third-party plugins: There are many third-party plugins available that extend the functionality of the block editor. These plugins can add new blocks, customize existing blocks, and provide additional features and functionality.

Mastering these advanced techniques can help you create more complex and dynamic layouts with the block editor and unlock its full potential.

Reusable Blocks

Another advanced feature available in the WordPress block editor is the ability to create reusable blocks. Reusable blocks are pre-made block designs that you can save and reuse throughout your website, which can save you time and streamline your content creation process.

To create a reusable block, first, create the block you want to reuse. Once you have the block set up the way you want it, select it and click on the three dots options icon in the block toolbar. From there, click “Create Reusable block”. You’ll be prompted to give the block a name, and once you do, it will be saved as a reusable block.

To use a reusable block, simply go to the block inserter and select the “Reusable” tab. You’ll see all of your saved reusable blocks, and you can insert them just like any other block. If you need to make changes to a reusable block, simply edit the block, and the changes will be applied to all instances of the block on your website.

Using reusable blocks can save you a lot of time and effort, especially if you have a lot of similar content to create. It also helps ensure consistency throughout your website, as you can reuse the same design elements in multiple places.

Groups

Using groups in the WordPress block editor can be a powerful tool for organizing and managing your content. With groups, you can link together multiple blocks and then easily move, copy, or delete them as a unit. This can be especially helpful when working with complex layouts or when you need to make changes to multiple blocks at once.

To create a group, select the blocks you want to group together, then click the “Group” option in the block toolbar or use the keyboard shortcut (Ctrl + G on Windows, Cmd + G on Mac). You can then customize the group’s settings by clicking on the group block and adjusting the options in the sidebar.

Using groups can also help to keep your content more organized and easier to manage. For example, you can use groups to separate different sections of a page or to group together related content. This can be particularly helpful for larger websites or blogs with a lot of content. Grouping your content together can make it easier for visitors to navigate your site and find the information they’re looking for.

Tips for Using the Block Editor Effectively
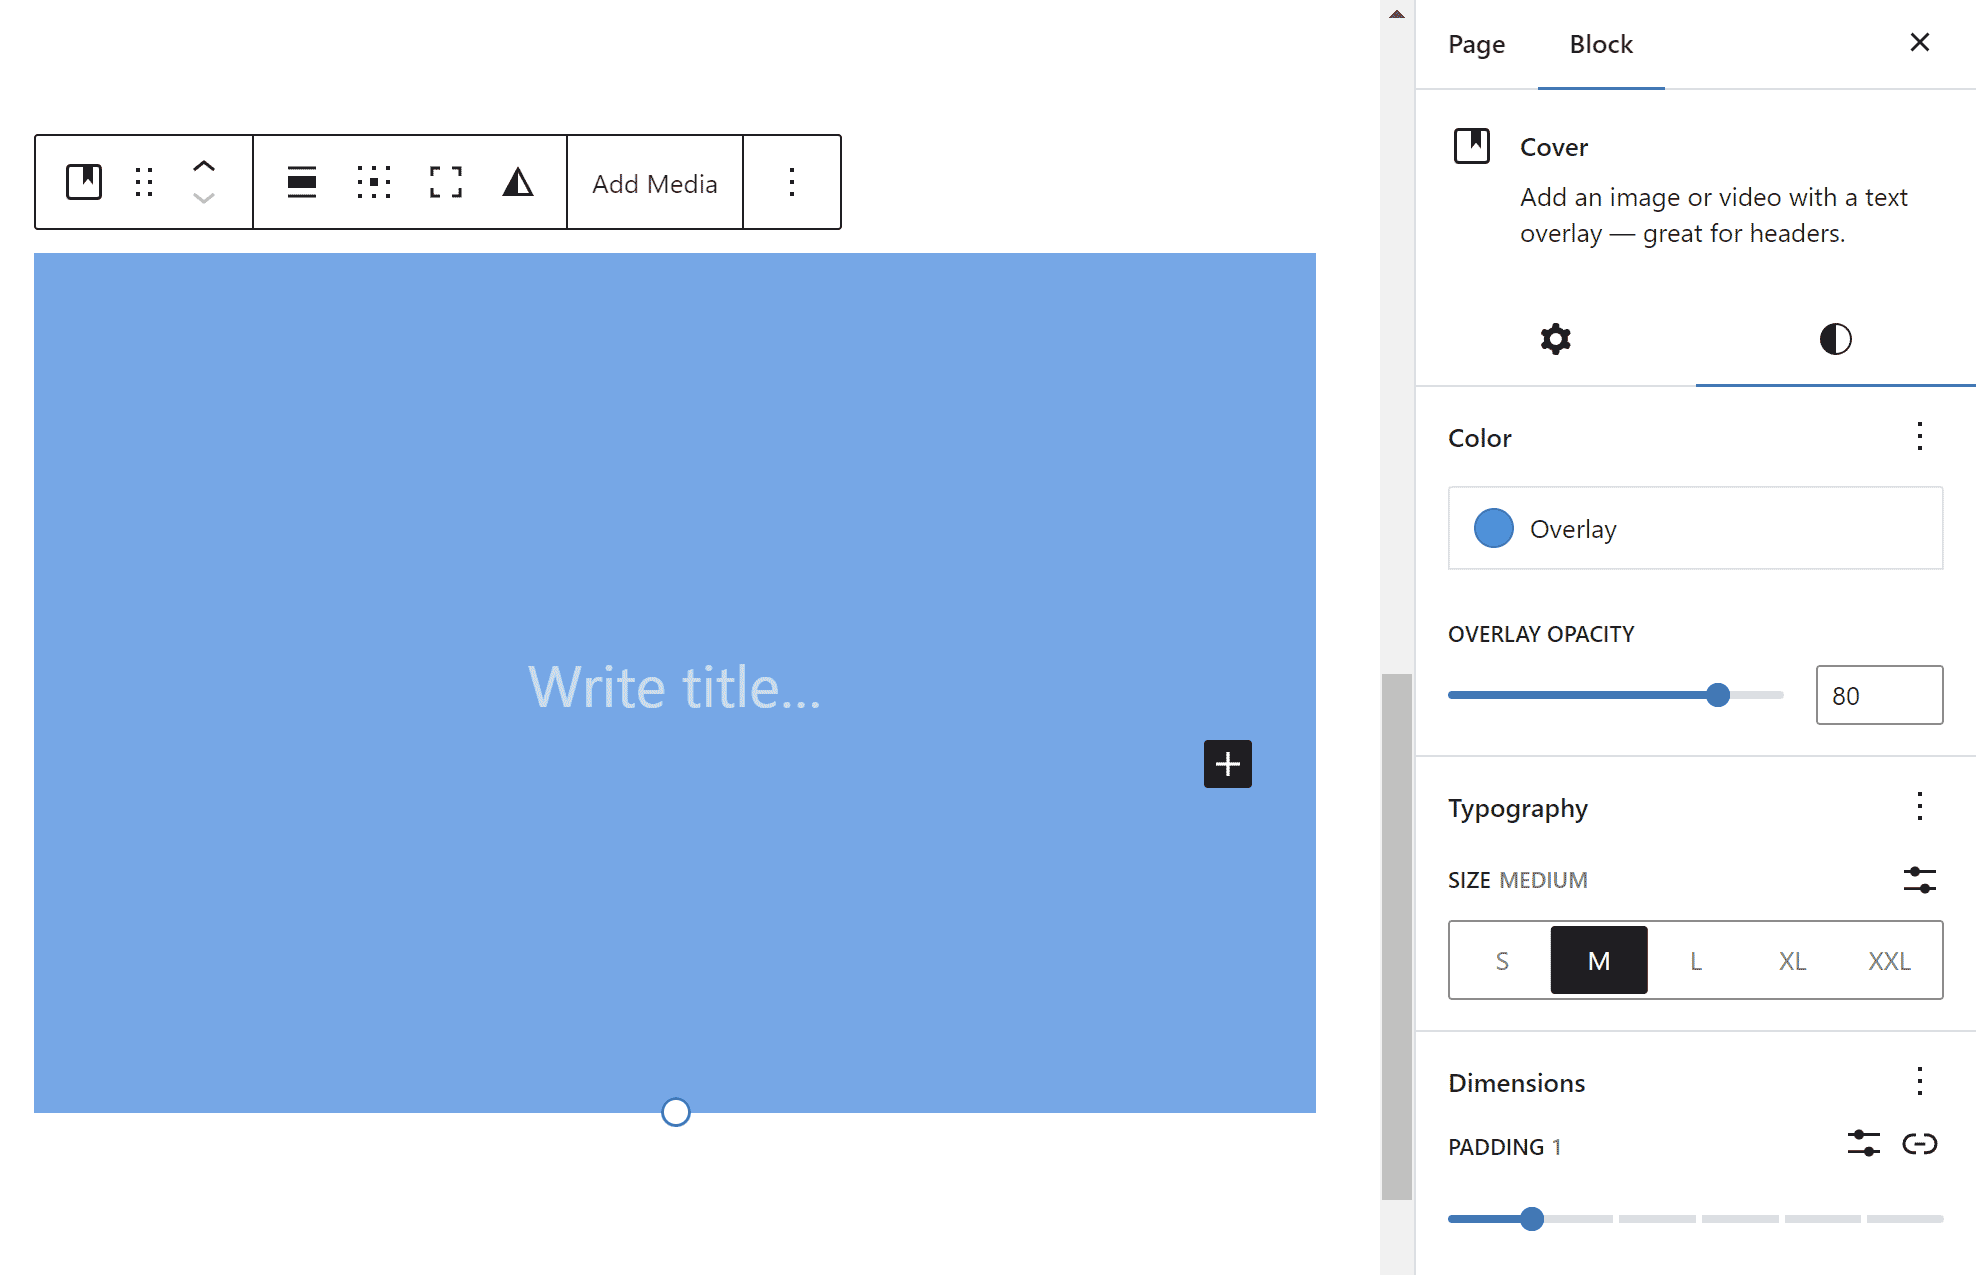
Cover Block
Cover Block

While the Block Editor is a powerful tool for creating engaging and dynamic content, it can also be overwhelming at first. Here are some tips to help you use the Block Editor more effectively:

  • Use keyboard shortcuts: Keyboard shortcuts can save a lot of time and speed up your workflow. Some popular shortcuts include Ctrl + C to copy, Ctrl + V to paste, and Ctrl + Z to undo.
  • Take advantage of block patterns: Block patterns are pre-designed layouts that you can use to quickly create engaging content. WordPress includes several block patterns by default, and you can also create your own.
  • Customize your toolbar: The Block Editor toolbar can be customized to include only the tools you use most often. This can help reduce clutter and make it easier to find the tools you need.
  • Use the document outline: The document outline in the Block Editor sidebar can help you keep track of your content’s structure and hierarchy. Use headings and subheadings to organize your content and make it more accessible.
  • Preview your content: The Block Editor includes a preview mode that lets you see how your content will look on the front end of your website. Use this feature to make sure your content looks great and functions properly.
  • Eliminate distractions: Improve your focus by enabling distraction free mode and making the editor fullscreen.

Following these tips can help you use the Block Editor to create beautiful, engaging content more efficiently.

Best Practices for Using the Block Editor

While the block editor can be a powerful tool for creating content, there are some best practices you should keep in mind to make the most of it. Here are some tips for using the block editor effectively:

  1. Organize your content: Use headings, subheadings, and bullet points to make your content easy to read and understand. Add a Table of Contents to help readers navigate through longer articles.
  2. Optimize for SEO: Use the Yoast SEO plugin to optimize your content for search engines. Use keywords in your headings, meta descriptions, and rich content to improve your search rankings.
  3. Avoid common mistakes: Be mindful of using too many blocks, which can slow down your website. Also, avoid using too many font styles and sizes, which can make your content look cluttered and unprofessional.
  4. Keep it simple: Use the block editor to simplify your content creation process. Don’t get bogged down with too many settings and formatting options. Stick to the basics and keep your content easy to read and understand.

By following these best practices, you can make the most of the block editor and create high-quality content that engages your readers and improves your search rankings.

Troubleshooting Issues With The Block Editor

While the block editor is generally user-friendly, there are some common issues that may arise while using it. For example, you may experience difficulty moving blocks or encounter unexpected formatting issues.

One way to troubleshoot these issues is to disable any third-party plugins that may be interfering with the editor. It’s also a good idea to ensure that your WordPress installation and all plugins are up-to-date, as older versions can sometimes cause compatibility issues. Additionally, you can try switching to a different browser or clearing your browser cache to see if that resolves the issue. If you’re still having trouble, you can consult the WordPress support forums or contact your web host for further assistance.

Start Using It!

The WordPress block editor is a powerful tool for creating engaging and visually appealing content. With its intuitive interface, advanced editing features, and reusable block functionality, it offers a more streamlined and efficient way to create content than the classic editor. By taking advantage of the many formatting and customization options available for each block, you can create content that stands out and resonates with your audience.

To use the block editor effectively, it’s important to follow best practices for organizing your content, optimizing for SEO, and avoiding common mistakes. And if you encounter any issues while using the block editor, there are many resources available online for troubleshooting and getting help.

Overall, the block editor is an essential tool for any WordPress user looking to create engaging and professional-looking content. With some practice and experimentation, you can master the block editor and take your content creation to the next level.
Create an Online Ecommerce Store With WordPress and WooCommerce

Creating an online ecommerce store can seem daunting, but with WordPress and WooCommerce, it’s easier than ever to get started. WooCommerce is a plugin that can be added to any WordPress site to turn it into a full-fledged ecommerce shop. It’s free to use and comes with a variety of features and customization options to help you create a unique and successful online store.

WordPress is one of the most popular content management systems (CMS) in the world, and WooCommerce is the leading ecommerce plugin for WordPress. Together, they make it easy to create a professional-looking and user-friendly ecommerce store without any coding experience.

Setting Up Your Store

If you don’t already have a WordPress site started, the first step will be to choose a web hosting provider and install WordPress. You can choose a pre-made WordPress theme from the directory, or hire a professional to design and build a custom theme just for you. Once you have your WordPress site up and running, you can install the WooCommerce plugin directly from the WordPress plugin repository. After installation, the setup wizard will guide you through the setup process, including setting up payment and shipping options.

To sell products on your ecommerce store, you’ll need to set up one or more payment gateways. Payment gateways are the services that securely process and authorize credit card payments on your website. WooCommerce supports a wide range of payment gateways, including popular ones like PayPal, Stripe, Square, and Authorize.net. It is important to consider the fees charged by each service, its ease of use, and the level of security provided. You should also ensure that the gateway you choose is compatible with your store’s location and the currencies you plan to accept.

You’ll also need to configure shipping options for your ecommerce store. WooCommerce supports a variety of shipping options, including free shipping, flat rate shipping, and real-time shipping rates based on weight and destination.

In addition to the core WooCommerce plugin, there are many other extensions and add-ons available to further customize your online store. These include integrations with popular payment gateways, inventory management systems, shipping providers, and much more.

Listing Your Products

Now it’s time to add your products to your store. You can do this manually, or you can import products in bulk using a CSV file. Each product should have a title, description, price, and any other relevant information such as variations, product images or videos, and shipping information. WooCommerce makes it easy to add products and categories, set prices, and manage inventory.

With WooCommerce, you can easily set up variations for your products, such as different colors, sizes, or styles. This allows your customers to choose the exact product that fits their needs, increasing the chances of a successful sale. You can also set different prices for each variation, which is useful if some variations are more expensive to produce or require different materials. Additionally, you can set stock levels for each variation, ensuring that you don’t oversell products that you don’t have in stock. Using product variations gives you a lot of flexibility in how you sell your products online.

Product images are an essential aspect of any online store as they help to showcase the products in the best possible way to potential customers. It is crucial to ensure that your product images are of high quality and accurately reflect the product being sold. This means investing in high-quality photography or hiring a professional photographer to take product photos. It is also important to ensure that product images are optimized for the web, as large images can slow down the site’s loading speed. Additionally, having multiple images of each product from different angles can help customers make informed decisions about their purchase. Finally, ensuring that product images are consistent in terms of size, shape, and style can help give the store a cohesive look and feel.

Marketing Your Store

Once your products are added, you can begin marketing your online shop. This may include setting up social media accounts, running targeted ads, and creating email marketing campaigns. It’s important to constantly analyze your store’s performance and make adjustments as needed. WooCommerce provides detailed analytics to help you track sales, traffic, and customer behavior.

Coupon codes are a popular marketing tool used by online retailers to drive sales and reward customer loyalty. With WooCommerce, you can easily create and manage coupon codes for your online store. Codes can be set up to offer a fixed discount, a percentage discount, free shipping, or other benefits. You can also specify the minimum order amount, the number of uses per coupon, and the expiration date. By using coupon codes strategically, you can encourage customers to make a purchase, increase customer loyalty, and drive more sales for your online store.

To ensure your ecommerce store is visible to potential customers, it’s important to optimize it for search engines. This includes adding relevant keywords to your product descriptions, optimizing your website’s structure and layout, and building backlinks to your website.

With WordPress and WooCommerce, creating an online ecommerce store has never been easier. With a bit of effort and dedication, you can attract and retain customers and turn your passion for selling into a successful online business.

Website Maintenance: Keeping Your WordPress Site Healthy

WordPress is by far the most popular content management system (CMS) in the world, with millions of websites using it to power their online presence. However, building a WordPress website is only the beginning of your journey. Maintaining your website is just as important as building it, as it helps ensure that your website stays secure, up-to-date, and optimized for the best possible user experience. In this article, we’ll explore the essential ongoing maintenance tasks you need to perform on your WordPress website to keep it running smoothly.

Keep WordPress Updated

WordPress regularly releases updates to fix security issues, bugs, and improve functionality. Keeping your WordPress site updated is an essential part of website maintenance, as it helps to ensure that your site remains secure, stable, and performs optimally.

You can update your WordPress site manually or automatically. To update WordPress manually, you need to log in to your WordPress dashboard and navigate to the updates section. Alternatively, you can download the WordPress core files from wordpress.org and upload them to your server manually.

To enable automatic updates, head to the updates page in the WordPress dashboard and choose to enable automatic updates for maintenance and security releases only, or for all new versions of WordPress. This will ensure that your site is always up to date without having to do it manually.

Update Plugins and Themes

Like the WordPress core, updating plugins and themes is also critical for maintaining the security and functionality of a WordPress website. Outdated plugins and themes can potentially introduce security vulnerabilities or compatibility issues with new versions of WordPress.

It is important to regularly check for updates and install them as soon as they become available. Most plugins and WordPress themes will display a notification in the WordPress dashboard when updates are available, and users can also check for updates manually.

Before updating plugins and themes, it is recommended to create a backup of the website to avoid potential data loss or other issues. In addition, it’s important to read the update release notes and check for any compatibility issues or known bugs that may affect the website.

If a plugin or theme is no longer being maintained or updated by the developer, it’s recommended to find an alternative solution or consider removing it from the website to avoid potential security risks.

Backup Your Website

Backing up a WordPress website is an important part of ongoing maintenance. Regular backups can help you restore your website to a previous state if anything goes wrong, such as a hacking attack or accidental deletion of important files.

There are several backup options available for WordPress, including manual backups and automated backup plugins. Manual backups involve downloading a copy of your website files and database to your local computer or cloud storage. This method is more time-consuming and may require technical knowledge, but it gives you complete control over the backup process.

Automated backup plugins, on the other hand, offer a more convenient option for backing up your website. There are several popular backup plugins available for WordPress, including UpdraftPlus, Jetpack Backup, and Solid Backups (formerly BackupBuddy). These plugins can schedule regular backups of your website files and database, and store the backups in a secure offsite location such as Dropbox, Google Drive, or Amazon S3.

No matter which backup option you choose, it’s important to test your backups periodically to make sure they are working properly. This can involve restoring your website from a backup and checking that everything is functioning as expected. By taking the time to back up your website regularly, you can ensure that your data is safe and secure, and that your website can be quickly restored in the event of an emergency.

Monitor Website Performance

Website speed is critical to test on a regular basis. Over time, your WordPress website may become slow and sluggish. This can be caused by a number of factors, such as outdated plugins, inefficient code, and too many images. Slow page load times and other performance issues can lead to a poor user experience and lower search engine rankings. There is a plethora of things that affect page speed, so it’s important to optimize your website on a regular basis to keep it running smoothly.

You can use free tools like Google PageSpeed Insights or GTmetrix to analyze your website’s speed and identify any areas for improvement. These utilities can help identify any bottlenecks in website performance, such as slow-loading images or inefficient code. They can also provide reports on page load times, file sizes, and other metrics that can help you optimize your website for better performance. If your website is slow, you can optimize images, use a caching plugin, or upgrade your hosting plan.

Secure Your Website

Securing your WordPress website is essential to protect it from hackers, malware, and other security threats. You can use plugins like Wordfence or Sucuri to monitor your website for suspicious activity, implement two-factor authentication, and add a firewall to your website.

WordPress websites are a common target for malware attacks. Malware is a type of malicious software that can infect your website and steal your visitors’ data. It is important to scan your website for malware regularly using a reputable security plugin. There are a number of free and paid malware scanning tools available.

Keep it Clean

Keeping your WordPress installation clean is an important part of ongoing maintenance. Over time, websites can accumulate and become cluttered with unnecessary data such as spam comments, post revisions, and unused media files, which can slow down the site’s performance and make it harder to manage. It is recommended to regularly clean up your website’s database, remove any unused plugins and themes, and delete any unnecessary files or data. There are even plugins available to help with cleaning up and optimizing your database and removing unnecessary files.

Additionally, optimizing images, using caching plugins, and minimizing the use of external scripts can help improve the speed and performance of your WordPress website. It’s also important to regularly test your website’s functionality and user experience to ensure that everything is working as intended.

Test and Fix

Checking your site for broken pages and incompatibilities with plugins is an important part of regular maintenance for any website. Broken links and display bugs can lead to a poor user experience, and incompatibilities with plugins can cause errors or even crashes on your site.

Every time your site receives a WordPress update or a plugin update, you should give your site a good once-over to make sure everything is still kosher, as often these updates can introduce new issues. If you notice any errors or problems after updating a plugin, you may need to troubleshoot or even uninstall the plugin to prevent further issues. It’s also important to only use well-reviewed and reliable plugins to minimize the risk of incompatibilities or other issues.

To check your site for broken links, you can use a plugin like Broken Link Checker or WP Broken Link Status Checker. These plugins will scan your site and alert you to any broken links so that you can quickly fix them.

In addition to these important maintenance tasks, here are a few other things to keep in mind:

  • Monitor your website traffic. It is important to monitor your website traffic so that you can see how people are interacting with your website. This information can be used to improve your website’s design, content, and functionality.
  • Keep your content fresh. One of the best ways to keep visitors coming back to your website is to keep your content fresh. This means regularly adding new blog posts, products, or services to your website. Don’t be afraid to shuffle things around, reword some of your copy, and add new images to keep it interesting.
  • Monitor your SEO performance. You can use tools like Google Search Console to track how well your site is ranking, which pages are performing well, and to see which are your most successful keywords. It can also help identify many other SEO and UX issues.
  • Moderate your comments. If your site has comments enabled, you will need to take time to approve the good comments, delete the toxic comments, and report the spam comments.

Maintaining a WordPress website is an ongoing process that requires time and effort. Think of a website as a living and breathing organism that requires constant TLC to keep it healthy. By following these essential maintenance tasks, you can ensure that your website stays secure, optimized, and up-to-date. Remember to back up, clean up, and test your website regularly to ensure the best possible user experience for your visitors.

WordPress: The Platform that Powers the Web

WordPress is the world’s most popular content management system (CMS) used for building websites. Over 40% of all websites are powered by this flexible and versatile platform. It’s a free and open-source software, which means that it is free to use and modify, and it enables users to create and manage websites without needing to know how to code.

At its core, WordPress is an SEO-friendly publishing platform built on PHP that allows users to create and publish content, including pages, articles, blog posts, and much more. It offers a user-friendly and familiar interface that makes it easy for anyone to manage their website. WordPress can be used to create a wide variety of websites, including blogs, business sites, and online stores.

WordPress works by combining a collection of core files, a MySQL database, and additional files that you upload or install. The core files are the foundation of WordPress and provide the basic functionality of the system. The database is where all of your content and settings are stored. The files that you add or install augment WordPress with new features and functionality, as well as customize the appearance of the front end of your website.

To use WordPress, you will need to purchase web hosting and a domain name. Web hosting is where your website files will be stored, and your domain name is the address of your website on the internet. Once you have purchased web hosting and a domain name, you can install WordPress on your hosting account. This will require uploading the core WordPress files over FTP and creating a MySQL database. Of if you prefer the easy button method, some web hosts have a handy one click install feature.

Once you have WP installed on your server, you can start customizing the look and feel of your website by choosing a theme. WordPress themes are pre-made designs that you can install and activate on your website. There are thousands of free and premium themes available, so there’s a good chance you can find one that suits most of your needs. Or if you’re ambitious, you can design and build one yourself.

In addition to themes, you can also add new features and functionality to your website by installing plugins. Plugins are small pieces of software that can be installed to extend the capabilities of WordPress. One of the key benefits of WordPress is its vast library of plugins, which allows users to add complex functionality to their website without needing to hire a developer. Users can install plugins to add nearly any feature you can think of, such as e-commerce functionality, social media sharing buttons, or search engine optimization tools.

In addition, WordPress is highly customizable, meaning developers can write custom code to add even more advanced features or modify existing ones. It’s also secure and regularly updated with security patches. This helps to protect your website from hackers and malware, and makes it a safe and reliable option for users who want to protect their online data.

The WordPress admin dashboard is easy to use and navigate. You can use it to add pages, posts, media, and other content to your website. You can also use the dashboard to manage your website’s settings, security, and performance.

Overall, WordPress is a powerful and versatile CMS that makes it easy for anyone to create and manage a website. Its flexibility, ease of use, and wide range of customization options have made it a popular choice for businesses, bloggers, and individuals alike.